Every year, house fires cause billions of dollars in property damage and claim thousands of lives across the United States. Working smoke alarms cut the risk of dying in a home fire nearly in half, yet many homes in the Phoenix metro area still have outdated, missing, or improperly placed detectors. If you’ve been searching for smoke alarm installation near me, you’re already taking the right step toward protecting your household.
Proper installation isn’t just about screwing a device into the ceiling. Placement, power source, interconnection between units, and local code requirements all matter, and getting any of these wrong can leave dangerous gaps in your coverage. At AZ DC Electric, we handle smoke alarm installations across Scottsdale, Mesa, Chandler, and the greater Phoenix area as part of our home electrical safety services, so we know exactly what Arizona homeowners need to get this right.
This guide breaks down the real costs of smoke alarm installation, walks you through the process step by step, and shares practical tips to help you decide whether this is a DIY job or one worth handing to a licensed electrician. By the end, you’ll know exactly what to expect, before any work begins.
What to know before you install a smoke alarm
Before you start searching for smoke alarm installation near me or picking up a detector at a hardware store, you need to understand what Arizona requires and what the different products actually do. Getting the basics right from the start saves you time, money, and the risk of a failed inspection or inadequate coverage.
Arizona codes and requirements
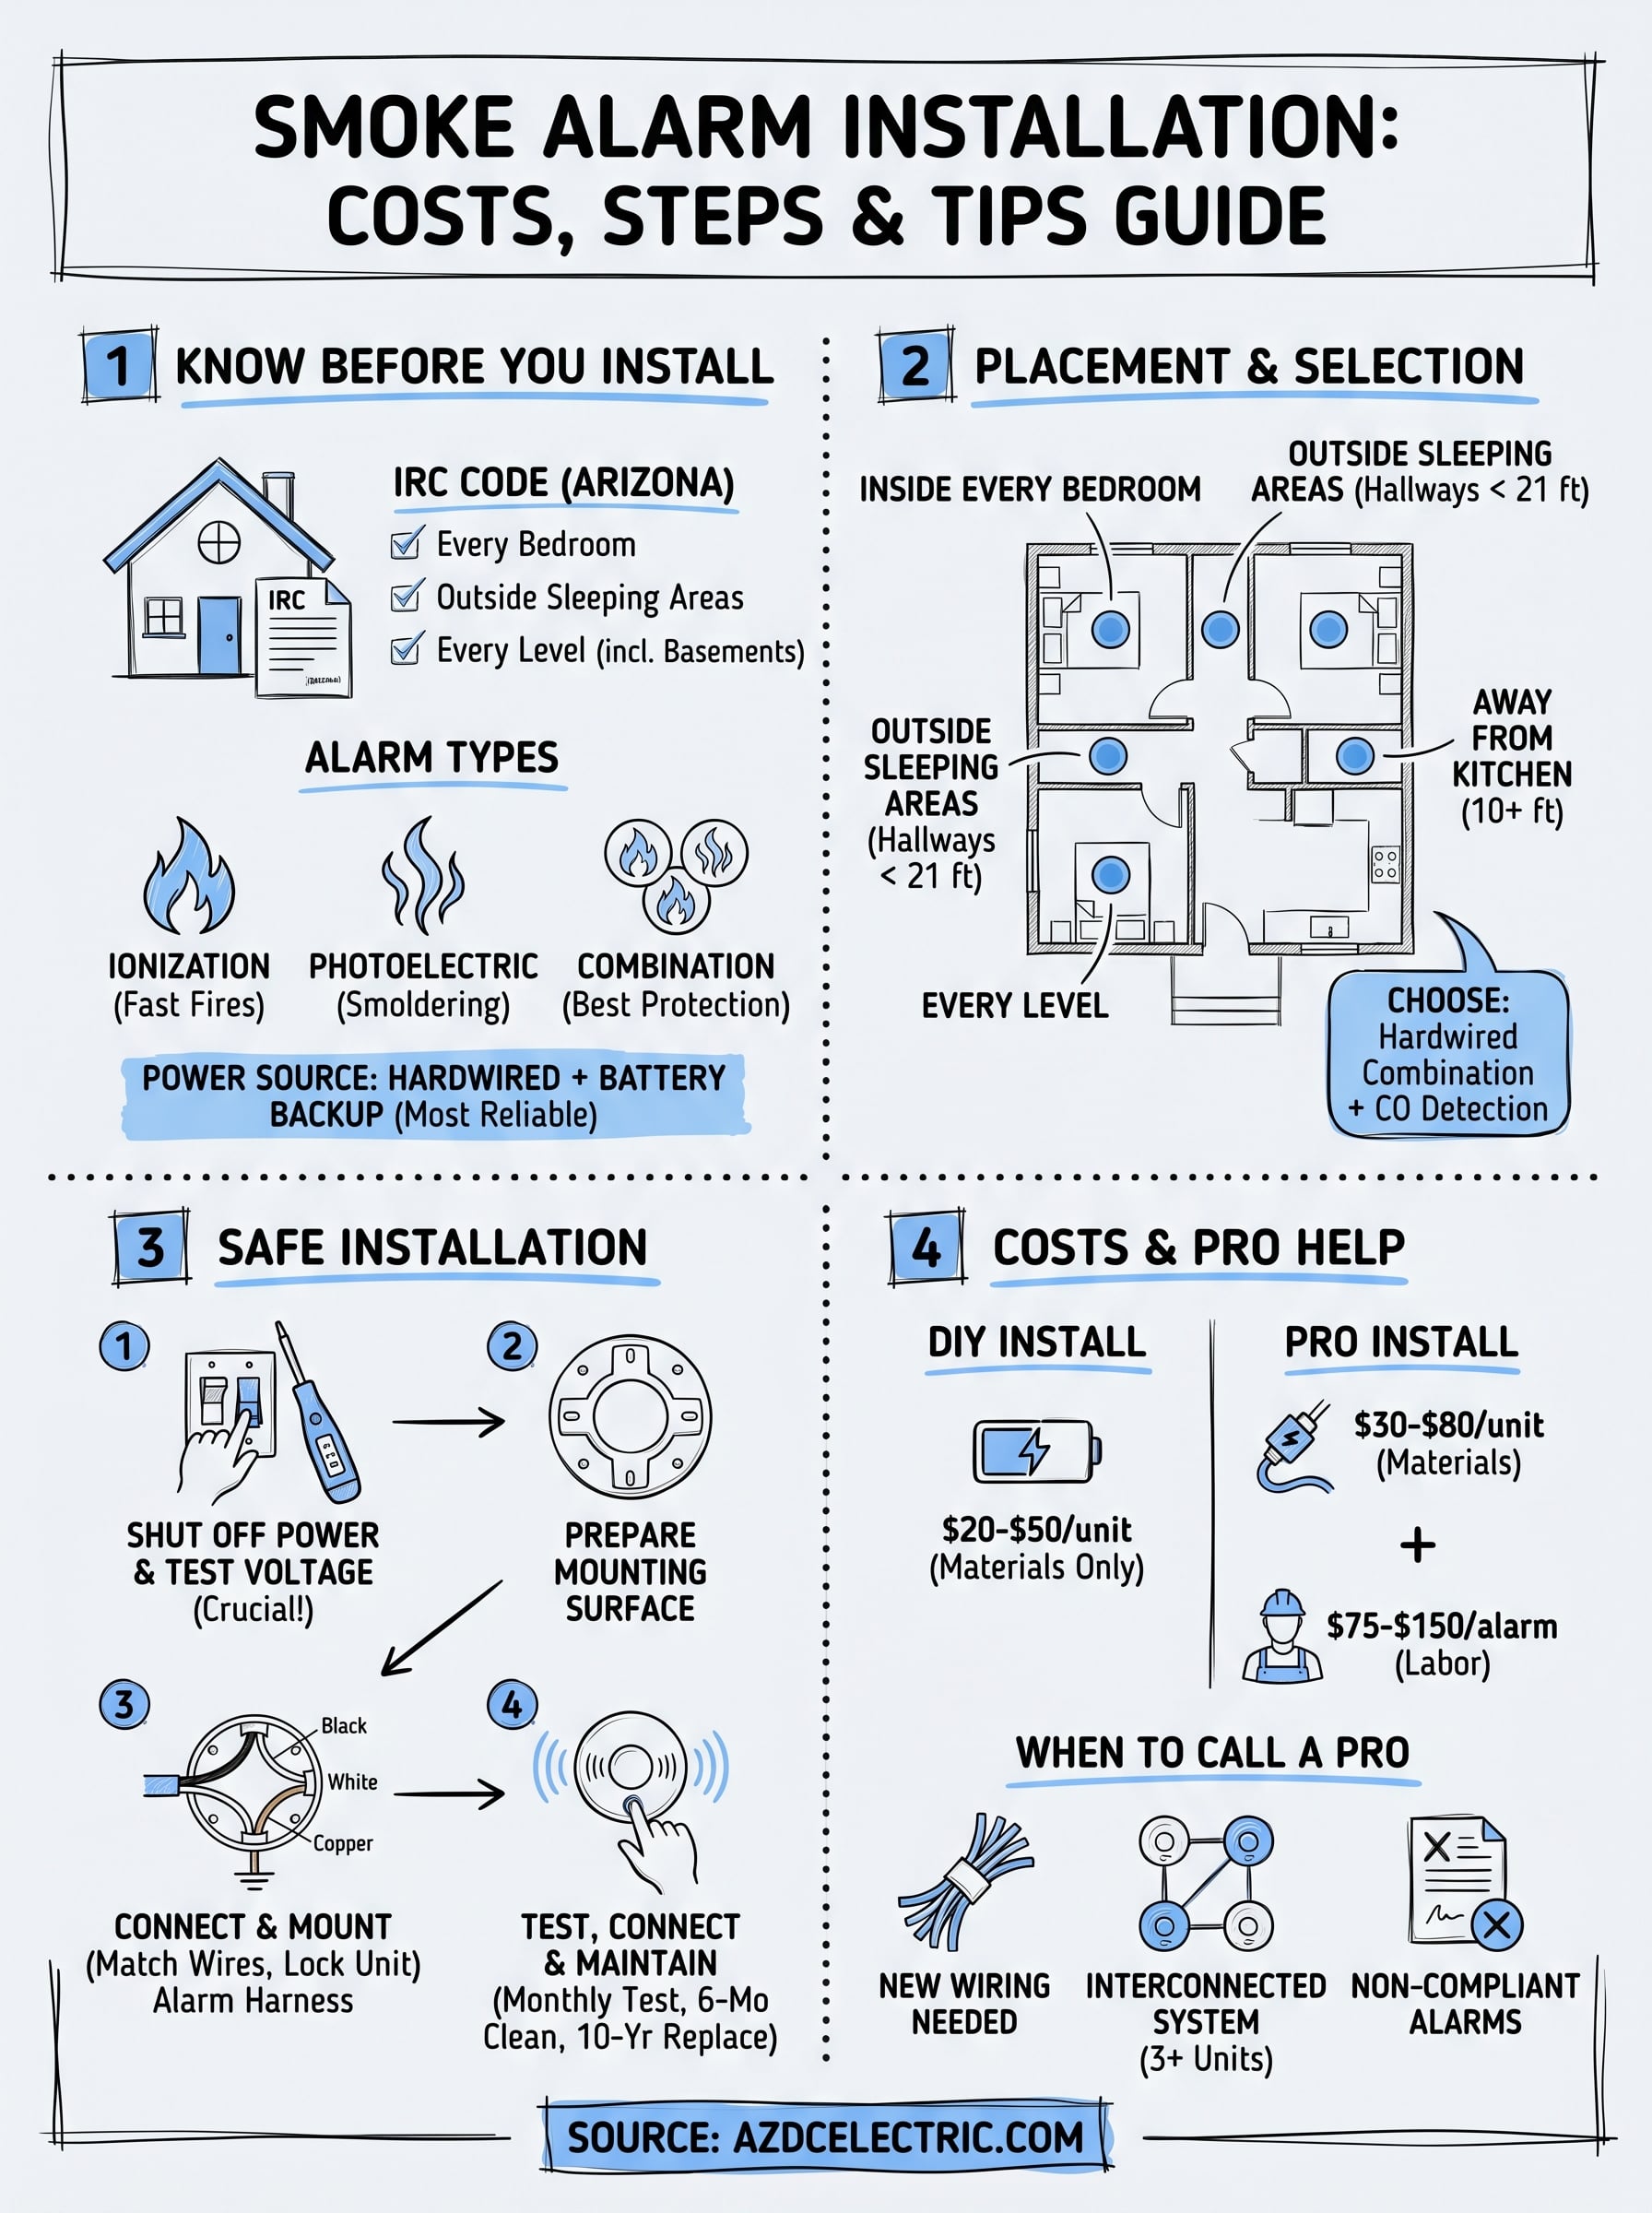
Arizona follows the International Residential Code (IRC), which mandates smoke alarms in every bedroom, outside each sleeping area, and on every level of the home, including the basement. If you’re doing a remodel or new construction in Scottsdale or the greater Phoenix area, your local building department will require hardwired, interconnected alarms so that when one triggers, all of them sound simultaneously. Battery-only units may pass in existing homes with no remodel work, but hardwired is always the stronger and safer choice.
When alarms are interconnected, you hear the alert no matter where the fire starts, which can make all the difference in a larger home.
Alarm types you need to understand
Ionization alarms respond faster to fast-flaming fires, while photoelectric alarms detect slow, smoldering fires more reliably. The National Fire Protection Association recommends using combination alarms that include both technologies, or installing one of each type in key locations. Many modern units also combine carbon monoxide detection, which adds another layer of protection with a single device.
Choosing the right power source matters just as much as the alarm type. Your options break down into battery-powered, hardwired with battery backup, and 10-year sealed battery models. Hardwired units with battery backup are the most reliable option for permanent installations because they keep working even during a power outage. If your home already has wiring for smoke alarms, upgrading to hardwired interconnected units is a straightforward job for a licensed electrician.
Step 1. Pick the right alarm and the right spots
Before you search for smoke alarm installation near me or purchase any equipment, take a few minutes to match the right alarm to your home’s layout and wiring. Making the right choices upfront prevents wasted money and repeat trips to the hardware store.
Choose your alarm type
Your home’s size and existing wiring determine which alarm fits best. For most Phoenix-area homes, a hardwired combination alarm with both ionization and photoelectric sensors plus carbon monoxide detection delivers the broadest protection in a single unit.
If your home already has wiring for smoke alarms, upgrading to a hardwired model takes only a few extra steps and gives you battery-backed protection that survives power outages.
Map out the required locations
Placement determines whether your alarms actually protect you. Use this checklist to cover every required spot:
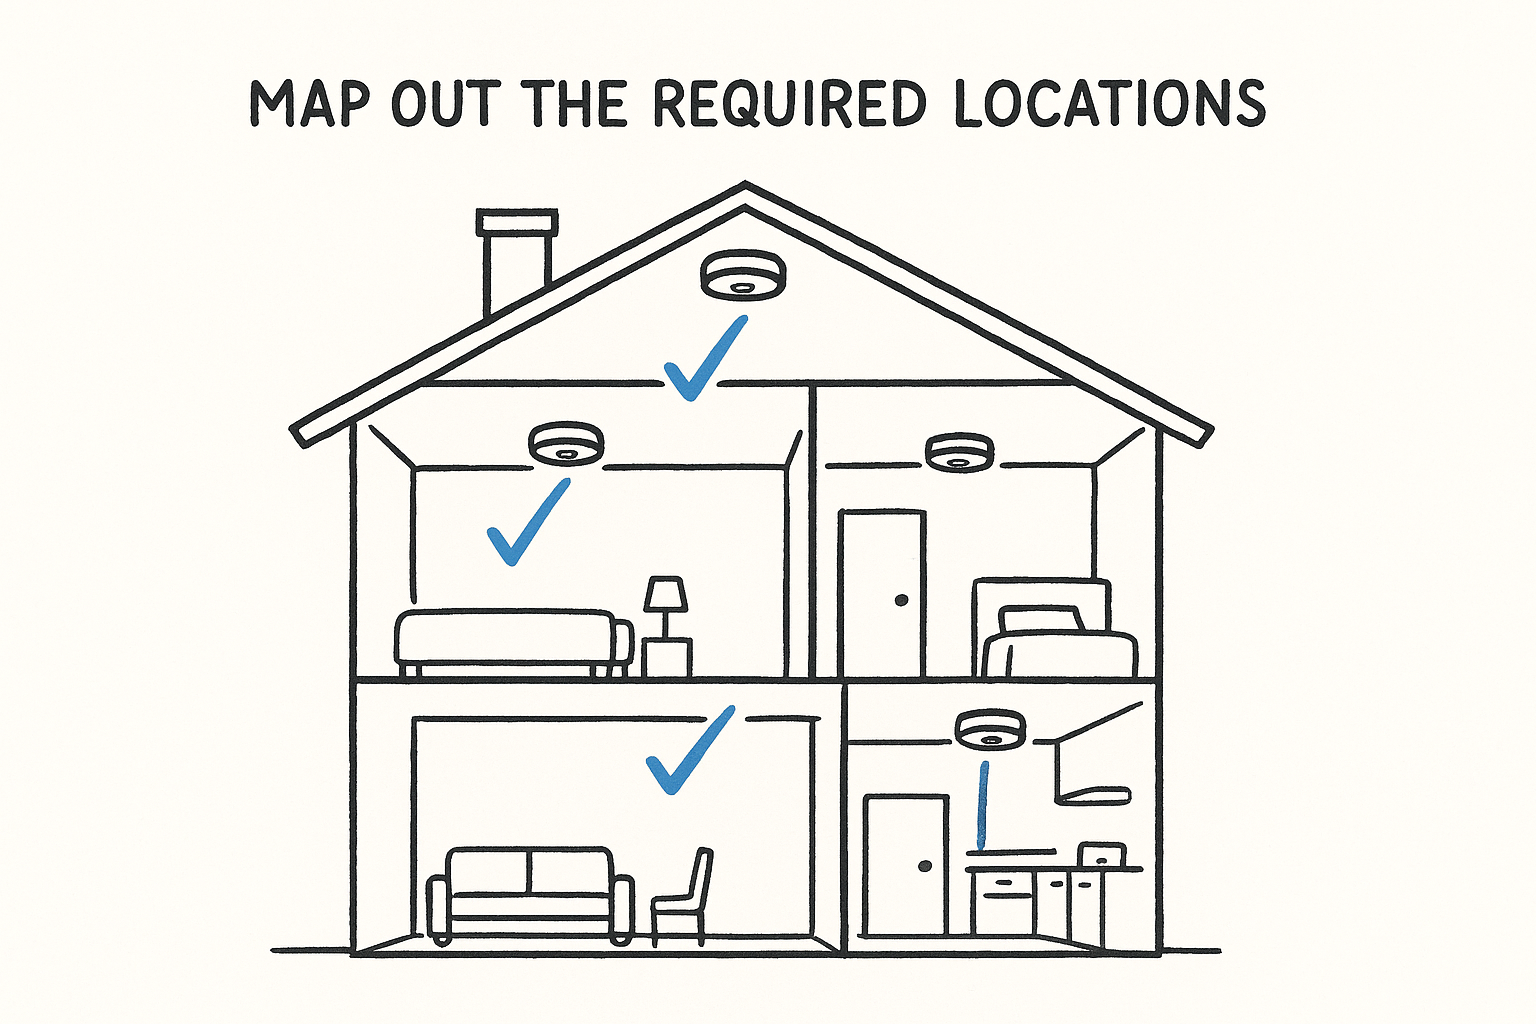
- Inside every bedroom, mounted on the ceiling or high on the wall
- Outside each sleeping area, in the hallway within 21 feet of bedroom doors
- On every level of the home, including finished basements
- At least 10 feet away from the kitchen to reduce false triggers from cooking
Once you have your locations mapped, count your units and confirm you have enough alarms before moving to installation.
Step 2. Install the smoke alarm safely
With your locations set, move into the physical installation. Safety is non-negotiable: before touching any wiring, shut off the circuit breaker for that area and use a voltage tester to confirm the power is dead at the wires before you proceed.
Never skip the voltage test, even if you’re certain you switched off the correct breaker.
Prepare the mounting surface
Most alarms attach to a mounting bracket that screws directly into the ceiling or wall. Hold the bracket in position, mark your screw holes with a pencil, and drill pilot holes where the surface needs them. For hardwired units, confirm the electrical box is properly anchored in the ceiling before you begin connecting any wires.
Connect and mount the alarm
Follow these steps in order for a clean, secure installation:
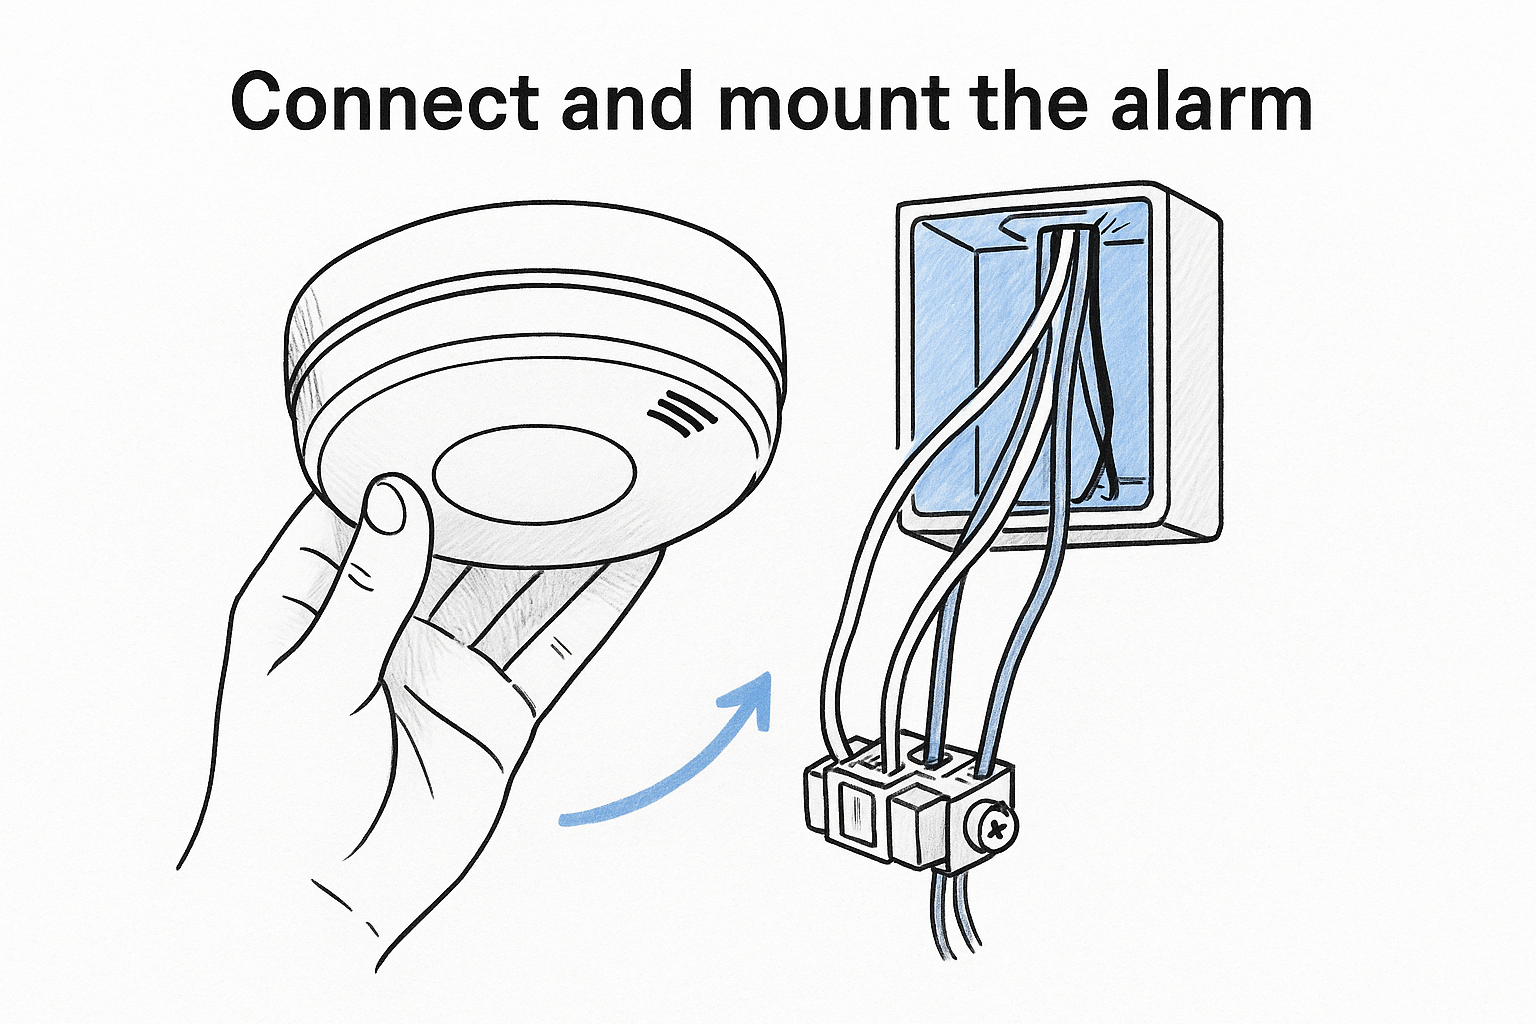
- Pull the wires through the electrical box
- Connect black wire to black, white to white, and bare copper to ground
- Attach the wire harness connector from the alarm to the ceiling wires
- Snap the alarm onto the bracket and rotate it to lock in place
If anything looks unfamiliar during the wiring process, searching smoke alarm installation near me and calling a licensed electrician is the right move.
Step 3. Test, connect, and maintain your alarms
Once the alarms are mounted, your job is not finished. Testing and ongoing maintenance determine whether your smoke alarms actually perform when you need them most. Run through these final steps before you consider the project complete.
Test every alarm after installation
Press and hold the test button on each unit for three to five seconds. A loud, steady alert confirms the alarm is receiving power and functioning correctly. For interconnected hardwired alarms, trigger one unit and confirm that every other alarm in the home sounds simultaneously, because that linked response is what protects you in a larger home.
If any alarm fails to sound during the interconnection test, turn the power off and recheck the wire harness connections before restoring power.
Keep your alarms working year-round
Maintenance is straightforward but easy to skip. Follow this schedule to stay protected:
- Monthly: Press the test button on each unit
- Every 6 months: Vacuum or blow out dust from the alarm vents
- Every 10 years: Replace the entire unit, regardless of condition
- Immediately: Replace any alarm that chirps repeatedly or fails a test
If you searched smoke alarm installation near me because maintenance revealed aging or failed units, a licensed electrician can replace hardwired alarms quickly and ensure your system stays up to code.
Smoke alarm installation cost and hiring a local pro
Knowing what to budget before you book saves you from surprises on the day of the job. Battery-powered alarms cost $20 to $50 per unit in materials for a DIY install. Hardwired interconnected alarms run $30 to $80 per unit, with professional labor in the Phoenix area adding $75 to $150 per alarm depending on access and existing wiring.
Getting upfront pricing before any work begins protects you from unexpected charges at the end of the job.
What affects your total cost
Several factors shift the final number on your invoice. Use this reference to estimate your project before you commit:
| Factor | Lower cost | Higher cost |
|---|---|---|
| Alarm type | Battery-powered | Hardwired interconnected |
| Units needed | 1 to 2 alarms | Whole-home system |
| Existing wiring | Already in place | New wiring required |
When to call a licensed electrician
If your home needs new ceiling wiring, lacks proper electrical boxes, or requires a fully interconnected system across multiple levels, a licensed electrician is the right call. Searching smoke alarm installation near me and booking a local pro removes the guesswork and ensures your installation meets Arizona code requirements from day one.
- No existing smoke alarm wiring in the home
- More than three interconnected units needed
- Current alarms flagged as non-compliant during an inspection
Wrap-up and what to do next
You now have a clear picture of what smoke alarm installation actually involves: the right alarm types, correct placement locations, safe wiring steps, testing routines, and realistic cost ranges for the Phoenix area. Following this process gives your home reliable, code-compliant protection without guessing.
Most battery-powered setups are manageable as a DIY project if you follow each step carefully. Hardwired, interconnected systems across multiple rooms are a different story, and that is exactly where a licensed electrician saves you time and prevents costly code violations down the road.
If you searched smoke alarm installation near me because your home needs new wiring, a full system upgrade, or a professional safety inspection, skip the guesswork and book directly with a local expert. The team at AZ DC Electric serves Scottsdale, Mesa, Chandler, and the greater Phoenix metro area with upfront pricing and a 5-year workmanship guarantee.