A GFCI outlet is one of the few things in your home that can genuinely save your life, but only if it actually works. These outlets are designed to cut power in milliseconds when they detect a ground fault, protecting you from electric shock in kitchens, bathrooms, garages, and anywhere near water. The catch? They can fail silently. An outlet that looks perfectly normal might offer zero ground fault protection, and you’d never know unless you test it. Knowing how to test a GFCI outlet is one of the simplest electrical safety checks any homeowner can do.
At AZ DC Electric, we perform electrical safety inspections across the Greater Phoenix Metro Area and find failed GFCI outlets more often than most homeowners would expect. That firsthand experience is exactly why we put this guide together, so you can catch a problem before it catches you.
This article walks you through three reliable methods: using the built-in TEST and RESET buttons, a plug-in GFCI tester, and a multimeter. We’ll also cover what to do if your outlet won’t reset or trip, and when it’s time to call in a licensed electrician for a replacement or deeper diagnosis.
What a GFCI does and when to test it
A Ground Fault Circuit Interrupter (GFCI) outlet monitors the flow of electricity between the hot and neutral wires in a circuit at all times. When it detects a difference of as little as 4 to 6 milliamps, it cuts power in about one-tenth of a second, fast enough to prevent a lethal electric shock. That reaction time is exactly why the National Electrical Code requires GFCI outlets in wet or damp locations, including bathrooms, kitchens, garages, outdoor areas, and anywhere near a pool or spa.
How a GFCI detects a fault
Inside every GFCI outlet sits a sensing coil that continuously compares the current leaving through the hot wire to the current returning through the neutral wire. Under normal operation, those two values stay nearly identical. When current leaks out through an unintended path, such as through your body to the ground, the resulting imbalance triggers the outlet’s internal circuit breaker in milliseconds, cutting power before a dangerous amount of current passes through you.
A GFCI can fail silently over time due to moisture exposure, internal component wear, or wiring issues, which means it may still supply power to devices while offering zero protection against a ground fault.
Simply plugging something in and having it turn on is not a reliable safety check. The outlet could be completely non-responsive to a fault condition even while it powers your lamp or phone charger without any issue. That silent failure mode is what makes periodic testing non-negotiable.
When you should test your GFCI outlet
Knowing how to test a GFCI outlet matters most when you build a consistent testing habit rather than waiting for something to go wrong. The U.S. Consumer Product Safety Commission recommends testing GFCI outlets once a month. Beyond that monthly check, you should run a test in these specific situations:
- After a power surge or storm, since voltage spikes can damage the internal sensing components
- After any outlet trips, to confirm it resets properly and still trips under a fault condition
- When moving into a new or older home, particularly if the wiring predates 2000
- After nearby electrical work, such as a panel upgrade or new circuit installation
- When devices on the circuit behave oddly, like cutting out or flickering unpredictably
Each test takes under a minute per outlet, and it remains the only reliable way to confirm the protection is actually working.
Before you test: safety, tools, and what to expect
Before you start learning how to test a GFCI outlet, take a moment to understand what you’re actually working with. Testing a GFCI outlet under normal conditions is low risk, but a few simple precautions and the right tools make the process faster and safer. Knowing what to expect also helps you interpret your results correctly instead of second-guessing them.
Safety precautions before you start
Testing a GFCI outlet does not require you to open any electrical panel or touch any wiring, which keeps the risk level manageable for most homeowners. You should still run through a short checklist before you begin, since the outlet’s location near water or its physical condition can change what steps are appropriate.
- Dry your hands completely before handling the outlet or any test equipment
- Check the outlet face for scorch marks, cracks, or a burnt smell and stop if you find any
- Confirm no standing water or puddles are present near the outlet
- Unplug any devices currently connected to the outlet before testing
If the outlet shows visible damage or a burnt smell, skip every test method and contact a licensed electrician instead.
Tools you need for each method
Your tool selection depends on which test method you plan to use. You do not need all three for a basic check, but having options available lets you run a full diagnosis if the outlet behaves unexpectedly.
| Test method | Tool required | Approximate cost |
|---|---|---|
| Built-in buttons | None | Free |
| Plug-in tester | GFCI outlet tester | $8 to $15 |
| Multimeter | Digital multimeter | $20 to $50 |
A plug-in GFCI outlet tester is the most practical starting point for most homeowners, since it produces clear, color-coded pass or fail readings without requiring any technical knowledge.
Step 1. Test with the built-in test and reset buttons
The simplest way to learn how to test a GFCI outlet is to use the two buttons built directly into the outlet face: TEST and RESET. This method requires no tools and takes under a minute. Every GFCI outlet manufactured after 2006 includes a built-in lockout feature that prevents the outlet from supplying power if the internal mechanism has failed, making this button test a reliable first check before moving on to any other method.
How to run the button test
Follow these steps in order to complete a proper button test:
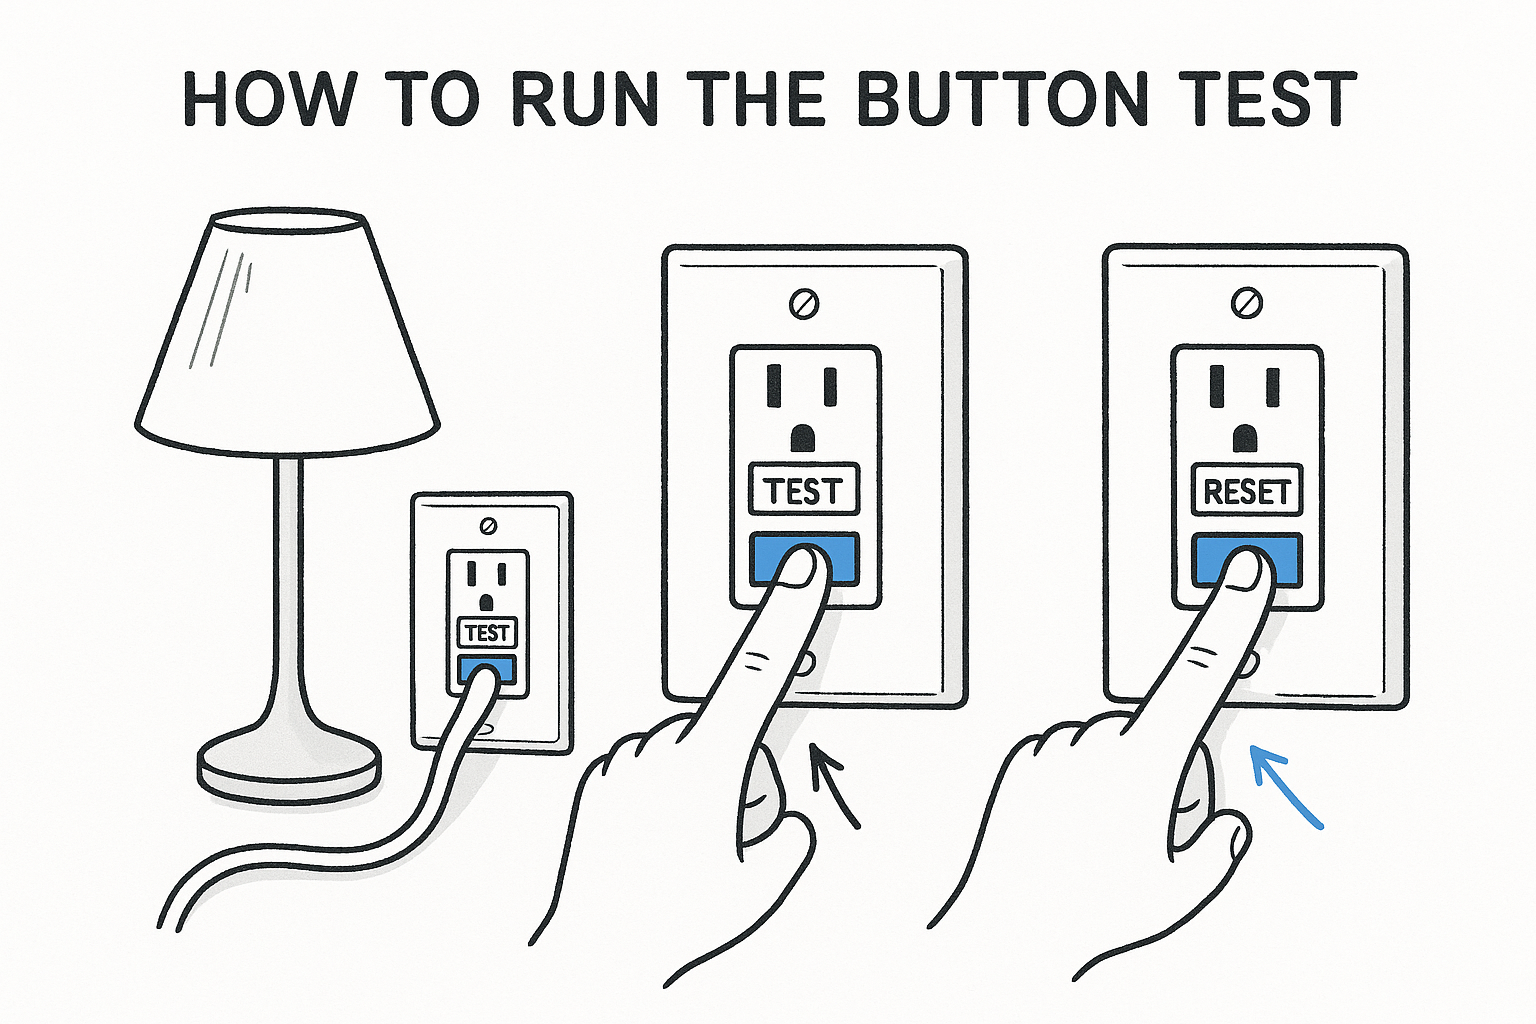
- Plug a lamp or small device into the outlet and confirm it powers on.
- Press the TEST button (usually black). The device should immediately lose power and you should hear a click.
- Press the RESET button (usually red) firmly until it clicks into place.
- Confirm the plugged-in device powers on again.
What your results mean
If your device lost power when you pressed TEST and regained it after pressing RESET, the outlet passed the button test and its basic trip-and-reset function is working correctly.
A GFCI outlet that does not cut power when you press TEST is either wired incorrectly or has a failed internal mechanism, and you should not rely on it for protection.
If the RESET button pops back out immediately or the outlet refuses to hold power after resetting, a failed internal component or a wiring problem is the likely cause, and that outlet needs replacement before you use it again.
Step 2. Test with a plug-in GFCI outlet tester
A plug-in GFCI outlet tester is the most thorough tool for how to test a GFCI outlet without opening any wiring or using technical equipment. These small devices cost between $8 and $15 at any hardware store and produce clear indicator light patterns that tell you exactly what condition the outlet is in, including wiring faults that the built-in button test alone cannot catch.
How to use the tester
Using a plug-in tester is straightforward and takes under 30 seconds per outlet. Follow these steps to get an accurate reading:
- Make sure no devices are currently plugged into the outlet.
- Insert the plug-in tester into the outlet firmly.
- Read the indicator lights on the tester face.
- Press the TEST button on the tester itself, not on the outlet.
- Confirm power cuts off, then press the RESET button on the outlet to restore it.
- Verify the indicator lights return to the passing pattern.
If the outlet fails to cut power when you press the tester’s TEST button, that outlet is not providing ground fault protection and needs to be replaced immediately.
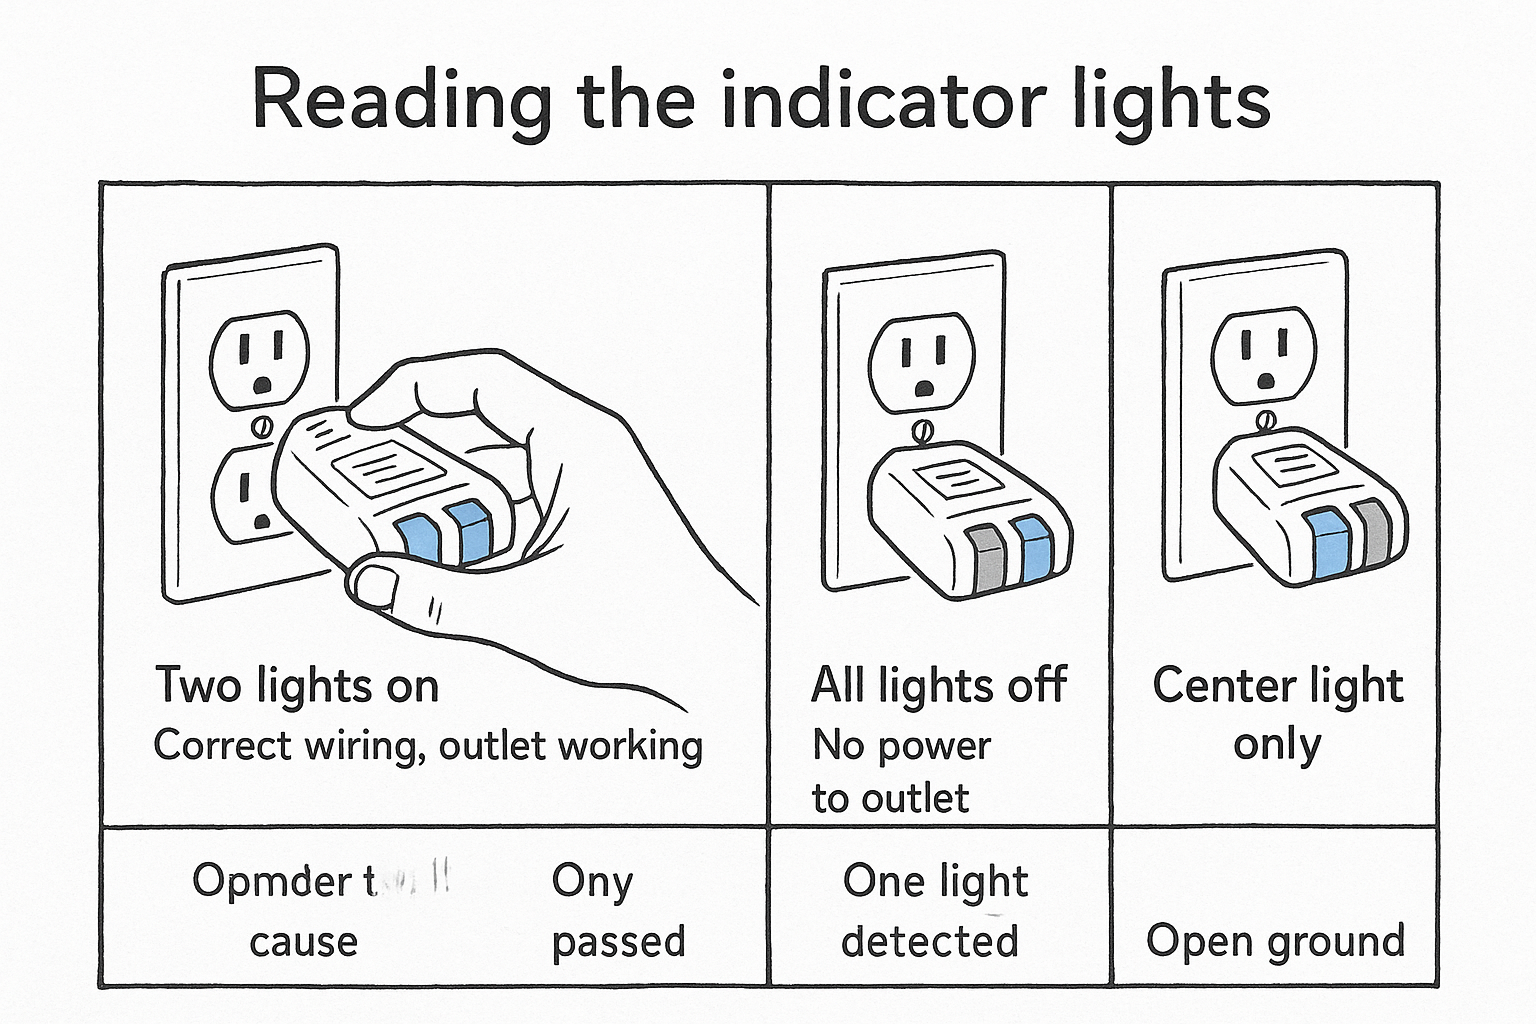
Reading the indicator lights
Every tester uses a light pattern guide printed directly on the device, but most share the same core readings. Understanding each pattern helps you act on the result immediately without guessing.
| Light pattern | What it means | Action needed |
|---|---|---|
| Two lights on | Correct wiring, outlet working | None |
| All lights off | No power to outlet | Check breaker or upstream GFCI |
| One light on (varies) | Wiring fault detected | Call a licensed electrician |
| Center light only | Open ground | Call a licensed electrician |
Step 3. Test with a multimeter and diagnose issues
A digital multimeter gives you the most detailed look at what’s happening inside a GFCI outlet, especially when the built-in buttons and plug-in tester leave you without clear answers. This method is the most thorough approach to how to test a GFCI outlet because it measures actual voltage at the terminals, confirming whether the outlet receives power, delivers it correctly, and trips as expected. You do not need an electrician-level skill set to complete this test, but handle the probes carefully and keep your hands away from exposed metal at all times.
How to take multimeter readings
Set your multimeter to AC voltage at a range above 120 volts, typically the 200V setting on most meters. Insert the red probe into the smaller (hot) slot and the black probe into the larger (neutral) slot. A healthy outlet reads between 110 and 125 volts. Then press the TEST button on the outlet itself, and the multimeter should immediately drop to 0 volts, confirming the outlet tripped correctly.
If the voltage does not drop to 0 after pressing TEST, the outlet’s internal trip mechanism has failed and you need to replace the outlet before using it again.
What your readings tell you
Your voltage reading identifies the exact condition of the circuit, not just a general pass or fail result. Use this table to diagnose specific faults based on what your multimeter shows:
| Reading | Condition | Action |
|---|---|---|
| 110-125V, drops to 0 on TEST | Outlet working correctly | None required |
| 0V before pressing TEST | No power reaching outlet | Check panel or upstream GFCI |
| 110-125V, stays on after TEST | Failed trip mechanism | Replace outlet immediately |
| Below 100V | Voltage drop or wiring fault | Call a licensed electrician |

Next steps for a safe home
Now that you know how to test a GFCI outlet using three different methods, the next step is turning that knowledge into a consistent monthly habit. Mark a recurring reminder on your calendar, grab your plug-in tester, and work through every GFCI outlet in your kitchen, bathrooms, garage, and outdoor areas. Most homes have six to twelve GFCI outlets, and the full check takes under 15 minutes from start to finish.
Replace any outlet that fails the trip test, refuses to reset, or shows a wiring fault on your tester. Those outlets are not protecting anyone, and delaying a replacement increases your risk with every use. If you find multiple failed outlets, unusual voltage readings, or outlets that keep tripping without an obvious cause, that pattern points to a deeper wiring problem that needs a licensed electrician. Contact AZ DC Electric to schedule a professional electrical safety inspection across the Greater Phoenix Metro Area.