Low-voltage landscape lighting can completely change how your yard looks and feels after dark, and the good news is that most homeowners can handle the installation themselves. If you’ve been searching for how to install landscape lighting low voltage, you’re probably ready to stop guessing and start digging. This guide walks you through the entire process, from choosing a transformer to burying the cable and positioning each fixture.
The job doesn’t require an electrician’s license or specialized tools, but it does require some planning. A rushed layout or undersized transformer will cost you time and money to fix later. We’ll cover how to avoid those common mistakes and get your system running right the first time, with clear steps you can follow over a single weekend.
At AZ DC Electric, we install and design outdoor lighting systems across the Greater Phoenix Metro Area every week. We wrote this guide based on what we see in the field, what works, what fails, and what homeowners wish they’d known before starting. If you hit a snag or decide you’d rather hand it off to a pro, our team is a phone call away with no dispatch fees.
Before you start: safety, tools, and materials
Low-voltage landscape lighting runs at 12 volts AC, which makes it far safer than working on the 120-volt circuits inside your home. That said, safe doesn’t mean consequence-free. You still need to respect the transformer, which plugs into a standard outdoor outlet and steps line voltage down to a usable level for your fixtures. Before you touch any part of the system during installation, confirm the transformer is unplugged and that the outdoor outlet is switched off.
The transformer is the only component in a low-voltage system that connects to line voltage – treat that plug-in point with the same care you would any outdoor electrical outlet.
Is this job safe for a DIYer?
For most of the installation, yes. Placing fixtures, running cable, and making wire connections at the fixture level are all well within a homeowner’s skill set. The only step that involves line voltage is plugging the transformer into a GFCI-protected outdoor outlet. If your home already has a working, weatherproof outdoor outlet near your planned transformer location, you can complete this entire project without an electrician. If no outdoor outlet exists, or if your existing one lacks GFCI protection, hire a licensed electrician to handle that part before you start the rest of the work.
Tools you’ll need
You don’t need anything specialized to finish this project. Most of what’s required is already in a standard homeowner’s toolkit, and anything missing is inexpensive to pick up. The list below covers layout, cable work, and verification tasks.
- Measuring tape – for spacing fixtures and calculating total cable length
- Rubber mallet – especially useful for driving stakes into compacted Arizona soil
- Wire stripper – for clean, reliable connections at each fixture point
- Flat spade or trenching shovel – for burying the main cable run at the correct depth
- Voltage tester or multimeter – for checking output at the transformer and confirming each connection
- Safety glasses and work gloves – for digging in rocky desert soil and handling wire
Materials to gather before you dig
Collecting all materials before you start saves you multiple mid-project hardware store trips. When learning how to install landscape lighting low voltage, think of your supply list in three categories: the power source, the cable run, and the fixtures. The table below gives you a clear picture of what to buy and what to look for.
| Material | What to look for |
|---|---|
| Low-voltage transformer | 150W to 300W for most residential yards; built-in timer and photocell preferred |
| 12-gauge direct-burial cable | Long enough to reach all fixture locations plus 15% extra |
| Low-voltage LED fixtures | Weatherproof-rated housing; LED bulbs for heat tolerance |
| Landscape staples | To secure cable before burial |
| Wire connectors | Match to your fixture brand when possible |
| Conduit (optional) | For sections crossing driveways or hardscape |
LED fixtures are the right choice for Phoenix-area installs because they draw significantly less wattage in high heat and outlast halogen alternatives by years. Always buy more cable than your measurements suggest – extra slack at each fixture connection and at the transformer makes the job cleaner and easier to adjust if you want to reposition fixtures later.
Step 1. Plan the layout and lighting goals
Planning on paper costs nothing and prevents expensive mistakes once fixtures are in the ground. Walk your yard after dark on a few different nights and notice where it feels unsafe, where attractive features disappear into shadow, and where you naturally want to look. Use those observations to build a layout that serves a real purpose rather than placing lights wherever feels convenient in daylight.
A rough sketch of your yard drawn to scale will save you more time during installation than any single tool you own.
Map your yard before buying anything
Take a measuring tape outside and draw a simple overhead sketch of your property. Mark the locations of walkways, garden beds, trees, focal points like a front door or water feature, and any structures such as fences or walls. Label the distance between each area you want to light. This sketch becomes your working document for every other decision in the project, from how many fixtures you need to how much cable to buy. Even a rough hand-drawn version works fine as long as you include real measurements.
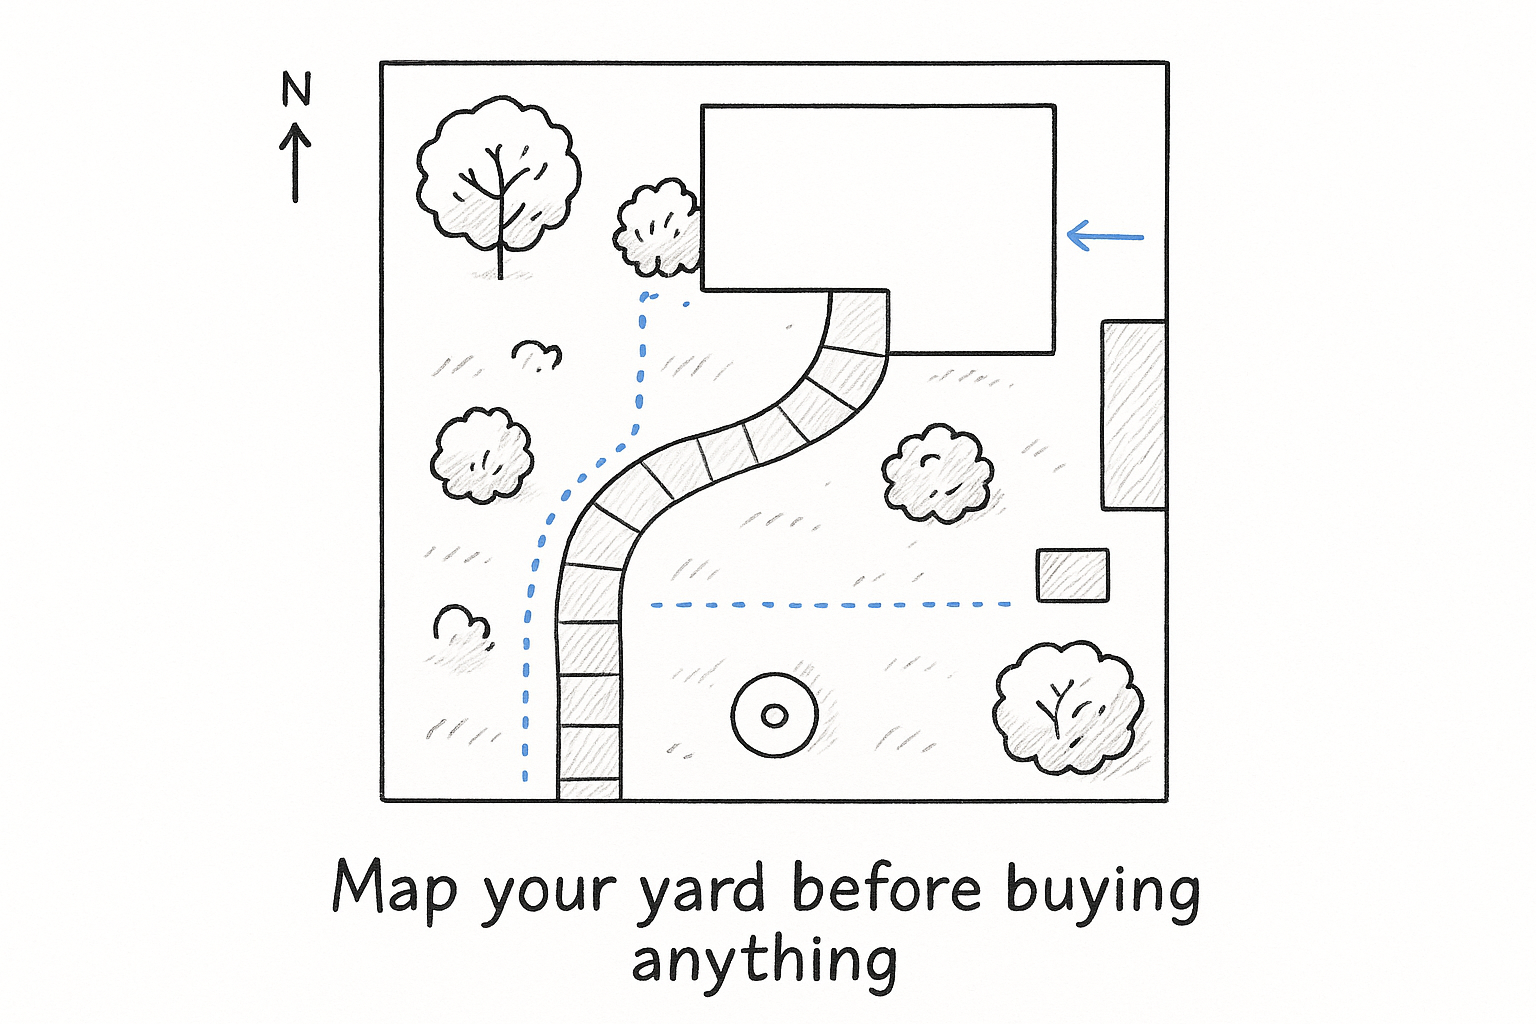
Use the sketch to identify:
- Pathway zones where consistent fixture spacing (typically 6 to 8 feet apart) improves both safety and appearance
- Accent points such as trees, shrubs, or architectural features that benefit from upward or directional lighting
- Dark gaps between fixture clusters where the cable will need to span a longer distance
Choose what you want to highlight
Knowing how to install landscape lighting low voltage starts with being clear on what the lighting should accomplish. Safety lighting along a walkway requires even, low-level illumination at regular intervals. Accent lighting for a focal tree or the front of your house needs angled, brighter fixtures placed a few feet out from the base of the object. Mixing both types in one system is common and works well as long as you account for the wattage difference when you size your transformer in the next step.
Your sketch should now show fixture types and approximate positions for each zone. Circle any spot where cable will cross a hardscape surface like a driveway or patio, since those sections will need conduit before you bury anything.
Step 2. Size the transformer and choose wire
Getting the transformer size wrong is the most common mistake homeowners make when learning how to install landscape lighting low voltage. An undersized transformer will dim your lights, trip constantly, or burn out early. Always calculate your total wattage load before you buy anything so you can match the transformer capacity to your actual system demands.
Calculate your total wattage load
Add up the wattage of every fixture in your planned layout. LED landscape fixtures typically draw between 3 and 7 watts each, so a system with 12 fixtures averaging 5 watts each equals 60 total watts. Once you have that number, add 20 to 25 percent as a buffer to account for voltage drop across the cable run and any fixtures you might add down the line. A 60-watt system needs a transformer rated for at least 75 watts to run reliably without overloading the unit.
Never run a transformer above 80 percent of its rated capacity – that buffer protects both the unit and your fixtures over the long term.
Use this quick formula before you head to the hardware store:
| Step | Calculation | Example |
|---|---|---|
| Total fixture wattage | Number of fixtures x watts per fixture | 12 x 5W = 60W |
| Add 25% buffer | Total watts x 1.25 | 60 x 1.25 = 75W |
| Choose transformer | Select next size up from result | Buy a 150W unit |
Buying a 150-watt transformer for a 75-watt load gives you room to expand without replacing the unit, which pays off if you decide to add a zone or a few extra fixtures later.
Choose the right wire gauge for your run length
12-gauge direct-burial cable is the right choice for most residential low-voltage systems because it handles longer runs with significantly less voltage drop than thinner 16-gauge wire. If your cable run from the transformer to your furthest fixture exceeds 100 feet, use 12-gauge wire for the entire run without exception. For compact systems under 50 feet with a small fixture count, 16-gauge is technically acceptable, but the small cost difference rarely justifies the tradeoff in performance. Always buy direct-burial rated cable since standard household wire breaks down quickly when exposed to Arizona soil, moisture, and heat cycling.
Step 3. Place fixtures and run the main cable
With your transformer sized and your cable purchased, the physical installation begins here. Set all your fixtures in position before you drive a single stake into the ground, because adjusting placement while everything is still loose takes seconds, while repositioning staked fixtures after you’ve run cable wastes significant time. Work from your sketch and use small flags or garden stakes to mark each fixture location temporarily.
Set fixture positions before you stake anything
Walk each zone with your sketch in hand and place fixtures at their marked locations without securing them yet. For pathway lights, stand at one end of the walkway and look down the line to check that spacing reads as even and intentional rather than random. For accent fixtures, crouch low and aim the fixture at its target, whether that’s a tree trunk, a shrub, or the face of a wall, to confirm the angle produces the look you want before locking anything in. Once every fixture sits in its intended spot and the layout reads correctly, drive the stakes fully into the ground with a rubber mallet.
Spend an extra ten minutes adjusting positions before staking – moving a fixture after cable is connected and buried costs you far more time than making the adjustment now.
Lay the cable run from transformer outward
This is where knowing how to install landscape lighting low voltage correctly pays off in the long run. Start at the transformer location and unroll your cable along the planned route, keeping it loose on the surface and following the path you mapped in Step 1. Lay the cable in a single run from the transformer toward your furthest fixture, looping close to each fixture location and leaving at least 12 inches of slack at every connection point. That extra slack gives you room to make clean connections and lets you reposition fixtures slightly without pulling the cable tight.
Use landscape staples every 24 inches along straight sections and every 12 inches around curves to hold the cable flat against the ground. Anywhere the cable crosses a hardscape surface like a driveway or path, slide it through conduit before securing it, since direct-burial cable alone won’t survive repeated foot traffic or vehicle weight over time.
Step 4. Make connections and test brightness
With the cable laid and all fixtures staked into position, you’re ready to make the electrical connections. This step is where most of the hands-on wiring work happens, and doing it cleanly now prevents loose connections that flicker or fail after burial. Work from the transformer outward, connecting each fixture in sequence along the cable run so you can track your progress against your layout sketch.
Connect each fixture to the main cable
Most low-voltage landscape lighting systems use one of two connector types: quick-connect snap connectors that pierce the cable insulation without cutting, or wire nut connections that require you to strip the cable and splice in the fixture lead wires. Snap connectors are faster and work fine for most standard installations, but stripped wire nut connections give you a more reliable contact point in high-heat environments like Phoenix, where thermal expansion and contraction can loosen a snap connector over time.
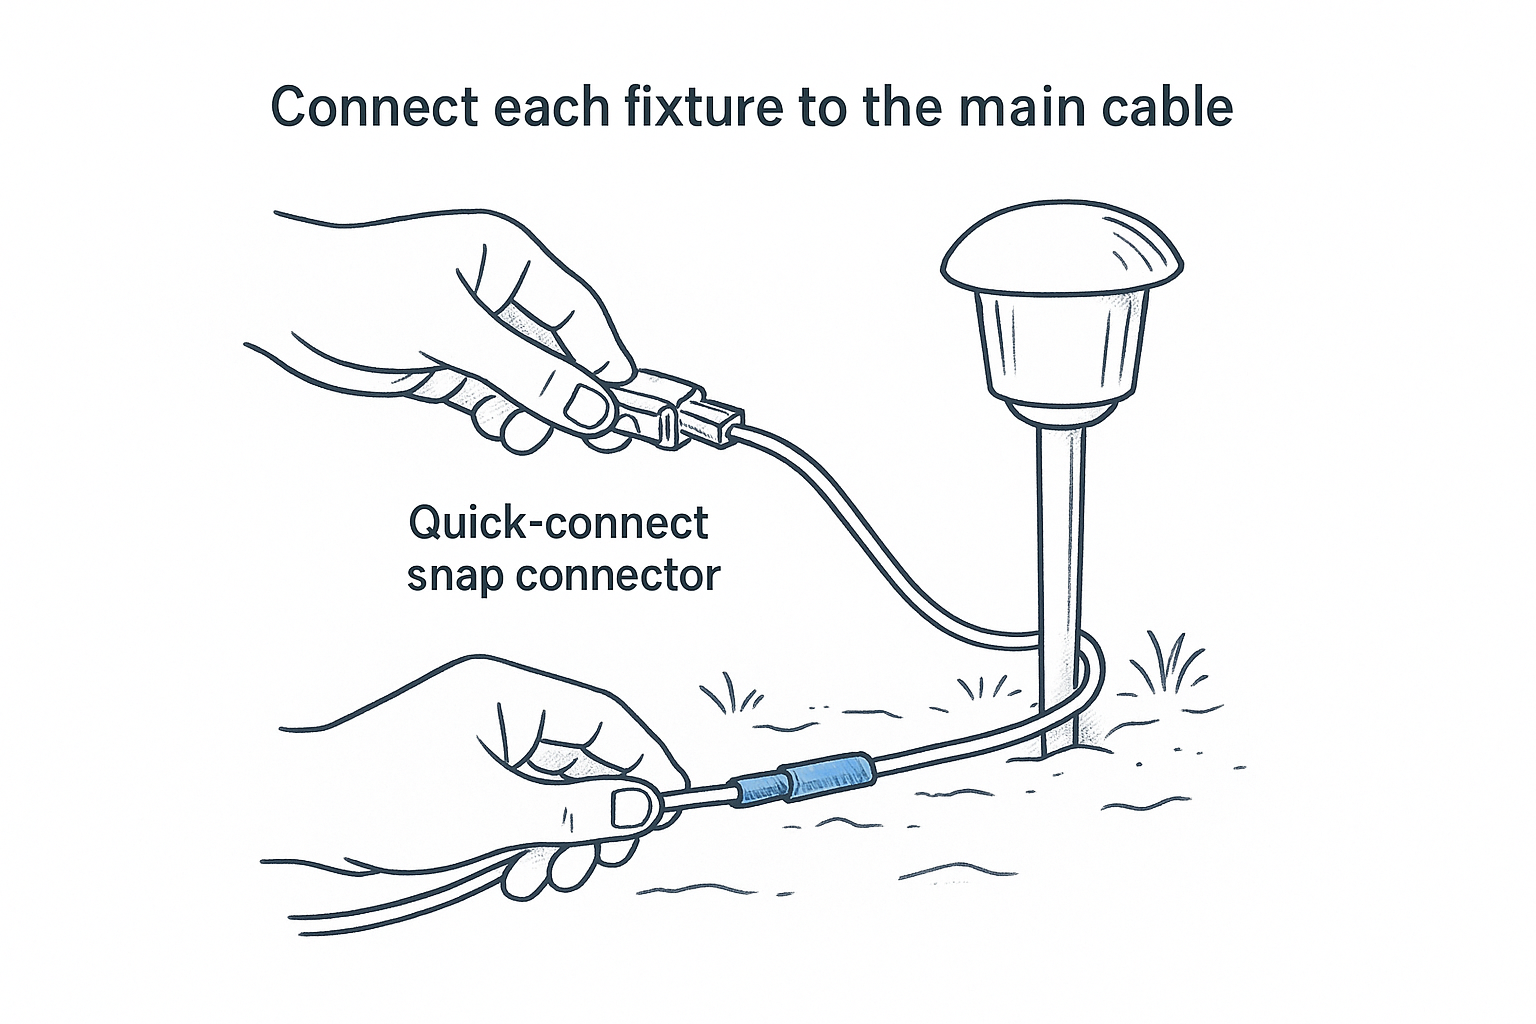
Follow these steps at each fixture location:
- Cut a small service loop of 6 to 8 inches of slack cable at each fixture point
- If using wire nuts, strip half an inch of insulation from both the cable and fixture lead wires
- Twist the matching wires together firmly and apply the wire nut until it seats with no copper exposed
- Wrap the connection in weatherproof electrical tape or use a gel-filled connector cap rated for direct burial
- Tuck the completed connection close to the fixture base
A loose or corroded connection at a single fixture can cause voltage drop that dims every light downstream on that cable run.
Test the system before burying anything
Once all fixtures are connected, plug the transformer into the outdoor GFCI outlet and switch it on manually rather than waiting for the timer to trigger. Walk the entire run and check that every fixture lights up at full brightness. If a fixture appears dim or dark, feel the wire nut connection for looseness and recheck that both wires are fully seated. A multimeter set to AC volts lets you measure output at the transformer terminals and at individual fixtures, so you can confirm that voltage drop across your cable run stays above 10.8 volts for consistent, even brightness.
Knowing how to install landscape lighting low voltage means resisting the urge to skip this verification step, since finding a bad connection after the cable is buried requires you to dig up sections to trace the fault. Fix every issue now while the cable is still accessible.
Step 5. Bury cable and set timer controls
With every fixture lit and every connection confirmed, you’re ready to bury the cable and lock in your timer settings. This final physical step protects the entire system from foot traffic, landscaping tools, and the heat cycles that degrade exposed wire in the Phoenix climate. Work methodically from the transformer outward along the same path you used to lay the cable.
Trench and bury the main cable run
Use a flat spade to cut a narrow trench 6 inches deep along the full length of your cable run. Six inches is the minimum depth recommended for low-voltage direct-burial cable in residential landscaping applications, and it keeps the wire clear of routine garden work like edging and aerating. Once the trench is open, remove the landscape staples, lower the cable into the bottom of the trench, and refill the soil firmly so no air pockets remain around the wire.
Burying at the correct depth is the single most effective thing you can do to extend the lifespan of your cable in Arizona’s rocky, heat-stressed soil.
Where the cable runs near driveways, sidewalks, or any other hardscape surface, confirm the conduit you installed in Step 3 is fully seated and covered. Backfill around conduit ends carefully so the transition from open ground to conduit stays flush and stable. After all sections are filled, tamp the soil lightly with your foot and replace any mulch or gravel you displaced during digging.
Set the transformer timer and photocell
Knowing how to install landscape lighting low voltage means finishing strong with accurate timer programming, since a poorly configured schedule wastes energy and shortens bulb life. Most modern transformers include both a manual timer dial and a photocell sensor that triggers the system automatically at dusk. Set the photocell sensitivity to medium as a starting point, then use the manual timer to define your desired off time, typically three to five hours after sunset for most residential yards.
Follow these steps to program a standard digital transformer:
- Press the "Set Clock" button and enter the current time
- Use the "On/Off" program slots to enter your desired run window
- Enable the photocell override so the lights activate automatically at dusk
- Run one full dusk-to-scheduled-off cycle and confirm every fixture performs as expected
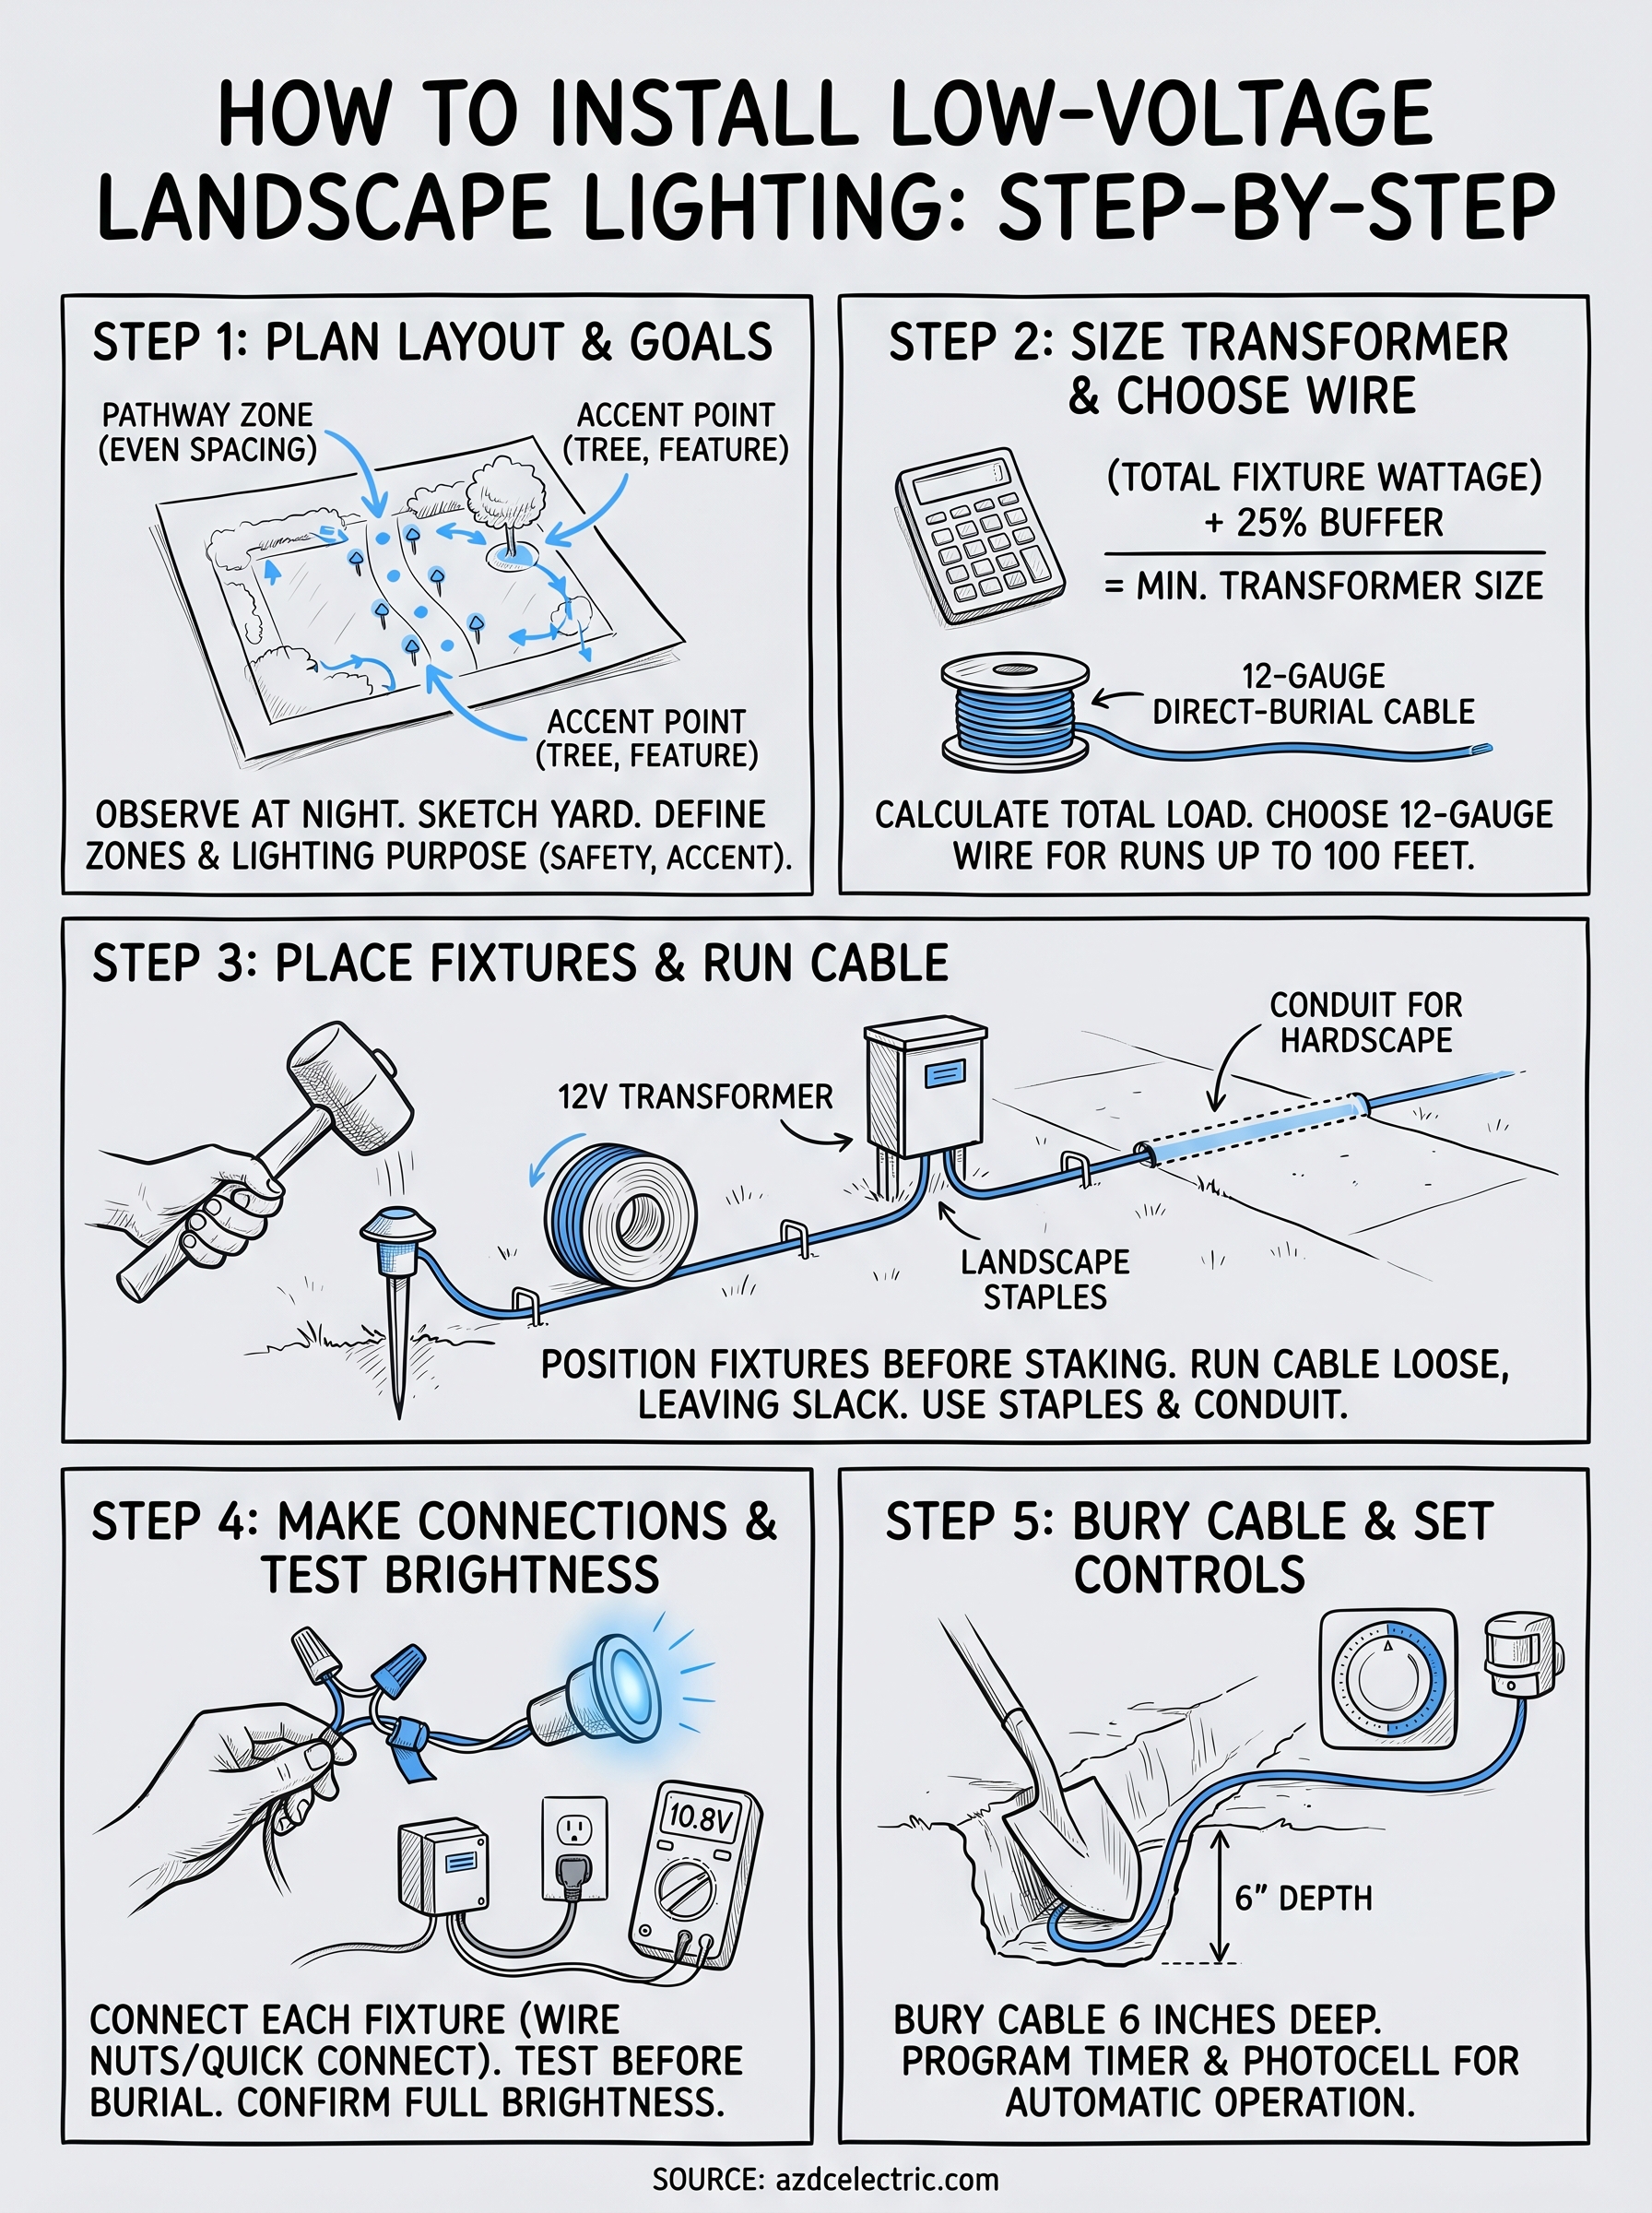
Next steps
You now have everything you need to complete a full low-voltage landscape lighting installation from transformer sizing to timer programming. Following each step in order, planning your layout first, matching your transformer to your actual wattage load, testing every connection before burial, and setting accurate timer controls, gives your system the best chance of running reliably for years without adjustments. Every detail covered in this guide on how to install landscape lighting low voltage is based on real-world installs we see across the Phoenix Metro Area, so the advice reflects what actually works in this climate.
If your project involves adding an outdoor outlet, upgrading your electrical panel to support new loads, or designing a more complex multi-zone lighting system, that work requires a licensed electrician. The AZ DC Electric team handles outdoor electrical work across Scottsdale, Mesa, Chandler, and the surrounding valley with no dispatch fees and upfront pricing. Book a consultation with our outdoor lighting team and we’ll get your yard lit right.