Installing a ceiling fan in a room that already has a light fixture is straightforward enough. But figuring out how to install a ceiling fan without existing wiring is a different project entirely. There’s no junction box waiting for you, no wires pulled through the ceiling, and no switch on the wall. You’re starting from scratch, and that means running new electrical cable, installing a fan-rated brace, and tying into your home’s electrical system safely.
This guide walks you through the full process, from planning your wire route through the attic or ceiling cavity to mounting the fan and wiring the switch. We’ll cover the tools you need, the materials you’ll buy, and the steps in order. We’ll also be straight with you about where the DIY line ends and licensed work begins, because some parts of this job, especially the panel and circuit work, carry real safety and code implications.
At AZ DC Electric, we handle ceiling fan installations across the Greater Phoenix Metro Area every week, including plenty of jobs where no existing wiring is in place. We’ve seen what goes right when homeowners prepare well, and what goes wrong when steps get skipped. Whether you take this on yourself or decide to call in a licensed electrician partway through, this guide will give you a clear understanding of what the job actually involves.
Before you start: safety, tools, and code basics
Working out how to install a ceiling fan without existing wiring involves far more than mounting hardware and connecting a few wires. You’re dealing with live electrical circuits, and skipping the preparation phase puts you at risk of shock, fire, or a failed code inspection. Before you buy materials or cut a single hole in your ceiling, take time to understand what’s required from a safety, tooling, and code standpoint. That groundwork is what separates a successful install from a dangerous one.
Safety rules you need to follow first
Turn off the circuit breaker for any area you plan to work near, then verify the power is off using a non-contact voltage tester before you touch any wire. Don’t rely on the wall switch alone. Switches only interrupt one leg of the circuit, and some older wiring configurations leave conductors live even when the switch is in the off position.
Never assume a wire is dead. Test it yourself with a voltage tester every single time before you make contact.
Wear safety glasses when working inside attic spaces or drilling through ceiling joists, and use a headlamp so both hands stay free. If your home was built before 1980, have the wiring checked for aluminum conductors or older cloth-wrapped cable before you tie into any existing circuits. Both require specific handling that goes beyond standard DIY practice, and connecting to them incorrectly creates a fire risk.
Tools and materials you’ll need
Gather everything before you start so you’re not climbing down from a ladder mid-job to make a hardware run. Here’s what this project requires:
| Category | Item |
|---|---|
| Safety | Non-contact voltage tester, safety glasses, work gloves |
| Cutting and fishing | Drywall saw, fish tape or fish sticks, flexible drill bit |
| Fastening | Power drill, drill bits, cable staples |
| Electrical | 14/2 or 12/2 NM cable, wire nuts, electrical tape |
| Support | Fan-rated brace kit (expandable or new-work style) |
| Finishing | Drywall patch compound, sandpaper, painter’s tape |
Choose 14/2 NM cable for a 15-amp circuit and 12/2 for a 20-amp circuit. Check your panel or the existing breaker for that room to confirm which applies. Using undersized wire is a code violation and a direct fire risk, so getting this detail right before you buy anything matters.
Permits and local code requirements
Most jurisdictions require a permit for new circuit wiring, which includes running cable from a panel or junction point to a new location. Check with your local building department before you begin. In the Phoenix Metro Area, Maricopa County and individual cities each maintain their own requirements, and pulling the correct permit protects you when you sell the home and during any future insurance claims.
Permitted work gets inspected, which means a licensed inspector verifies the cable routing, box support, and connections against the National Electrical Code. That inspection is worth more than it costs. If you’re not comfortable pulling the permit yourself, or if the scope of work requires any changes at the panel, that’s the practical point where hiring a licensed electrician is the right call rather than an optional one.
Step 1. Pick the location and map a wiring path
Location choice drives every other decision in this project. Where you place the fan determines how much cable you need, which joists you’ll drill through, and whether attic access makes the job practical or painful. Spend 20 minutes planning this before you buy a single foot of wire, and every step after this one goes faster.
Choose where the fan will hang
The center of the room is the standard placement, but that’s not always where a structural joist runs. Ceiling fans need a solid mounting point, either directly to a joist or through a fan-rated expandable brace that spans between two joists. Use a stud finder to locate the joists and mark them with painter’s tape. Then measure the room to find the true center and see how close it lands to a joist or the midspan between two joists.
Clearance is another factor you can’t ignore. The NEC requires at least 7 feet of clearance between the floor and the fan blades. In rooms with standard 8-foot ceilings, that restricts you to flush-mount or low-profile fans. If your ceiling is lower than 8 feet, a standard downrod won’t work.
Map your cable route
Once you know where the fan box goes, trace how the cable will travel from a nearby power source up to the fan location and then down the wall to the switch. The cleanest path in most Phoenix-area homes runs up through the wall cavity, across the attic floor, and back down through the ceiling at the fan location. If you have a finished attic or no overhead access, you’ll need to fish wire through the ceiling cavity, which adds real complexity to how to install a ceiling fan without existing wiring.
Sketch the full route on paper before you cut anything. A rough diagram prevents you from opening walls you never intended to touch.
Use this checklist to confirm your route is workable before you commit:
- Attic access point sits within a practical distance of the fan location
- No HVAC ducts, plumbing pipes, or blocking obstruct the cable path
- Wall cavity runs clear from the ceiling down to your planned switch height
- You can reach a circuit breaker panel or approved junction box to source power
Step 2. Install a fan-rated box and solid support
The box and brace you install here carry the full weight of the fan, so this step has zero margin for error. A standard light fixture box is not rated for the dynamic load a spinning fan creates, and using one is both a code violation and a genuine falling hazard. Every part of your mounting assembly, from the brace to the box itself, must be explicitly rated for ceiling fan use before you hang anything from it.
Choose the right type of brace
Your choice of brace depends on whether you have attic access above the fan location. If you can work from the attic, a new-work brace nails directly to the joists on either side of your opening, giving you a rigid and permanent anchor point. If the ceiling is already finished and attic access is impractical, an expandable brace kit is the correct tool. You insert it through the same hole the box will occupy, position it between the two nearest joists, and twist it until the threaded rod locks tightly against both joists from below.
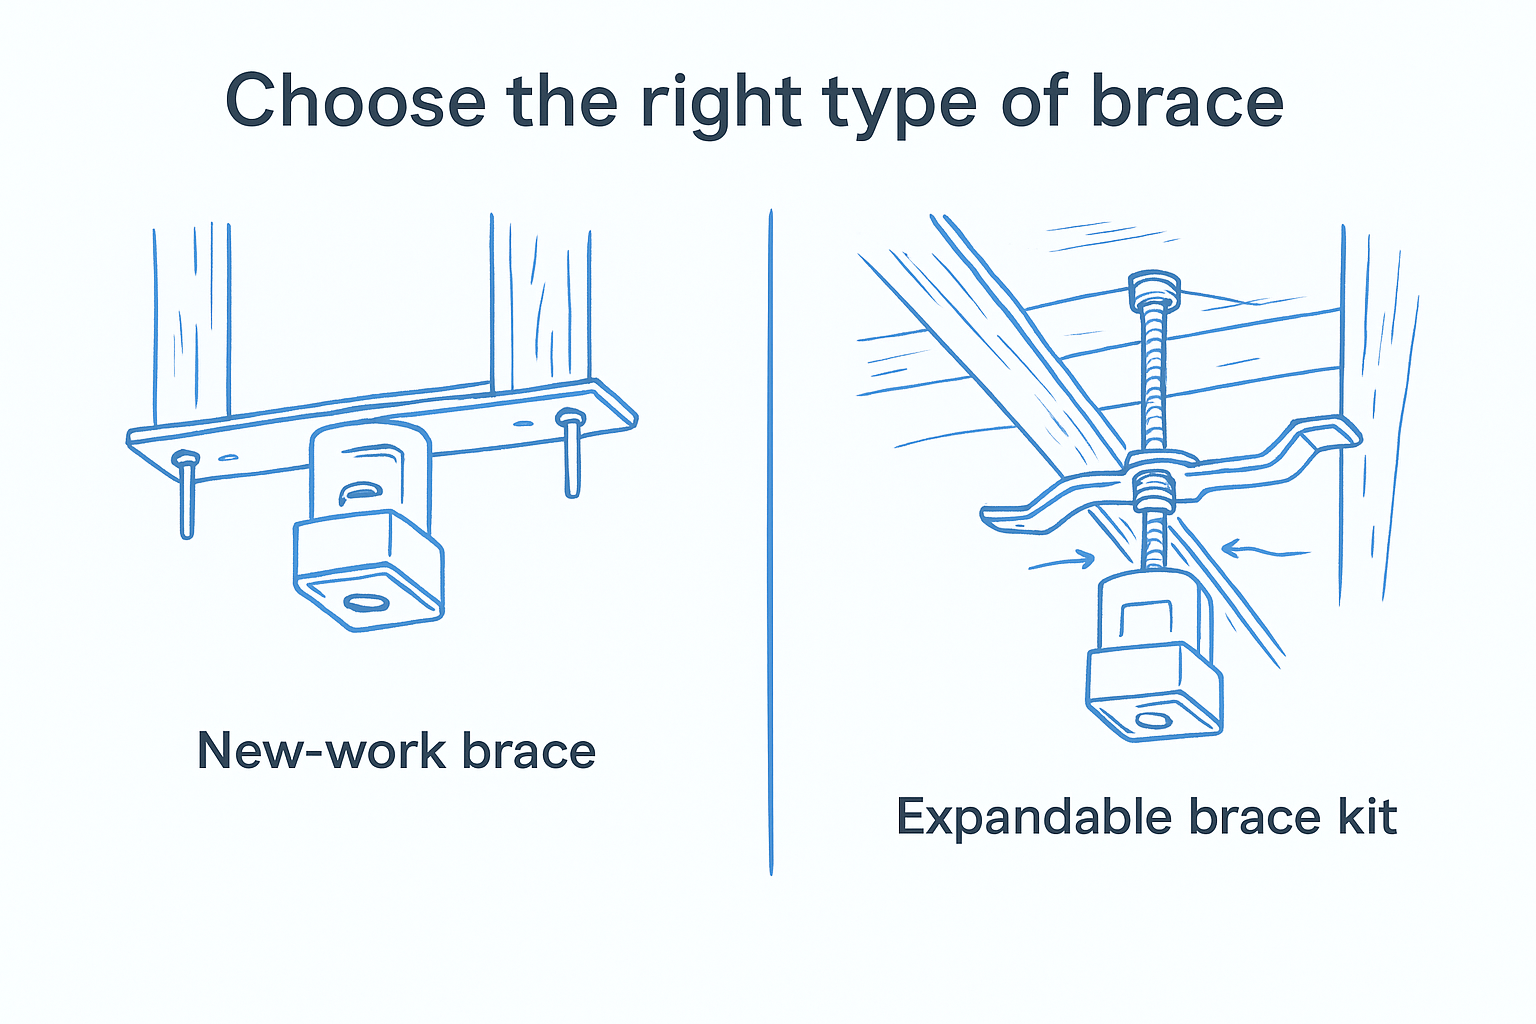
Never mount a ceiling fan to drywall alone, even with toggle bolts. The drywall will fail under the oscillating load, and the fan will come down.
Both brace types work in the context of how to install a ceiling fan without existing wiring, but expandable brace kits are the more common choice for retrofit installs where you’re cutting a new hole in finished drywall. Look for kits that include a listed fan-rated box, since buying the brace and box as a matched set ensures the components are tested together.
Seat and secure the box correctly
Once the brace is locked in place, thread the fan-rated box onto the center rod of the brace according to the manufacturer’s instructions. Tighten the mounting nut firmly so the box sits flush with the ceiling surface. Then pull your rough cable through the knockout opening on the side or bottom of the box, leaving at least 6 inches of wire inside the box for comfortable connections in the next step. Tug on the box after everything is tightened to confirm it doesn’t shift or rotate before you proceed.
Step 3. Run new cable and add the right wall switch
Running cable is the most physically demanding part of how to install a ceiling fan without existing wiring, and it rewards careful preparation. Before you feed a single foot of cable, confirm your attic access point and trace the exact route you mapped in Step 1. Deviating from your planned path mid-run wastes time and often means opening additional drywall.
Fish the cable through the ceiling and wall
Start the cable run from the fan-rated box location in the attic, if you have overhead access. Drill through the top plate of the wall using a flexible drill bit long enough to clear the ceiling joists. Feed the cable from the attic down through the drilled hole toward the switch opening in the wall. Use fish tape or fish sticks to pull the cable through the wall cavity if it snags on insulation or blocking along the way.
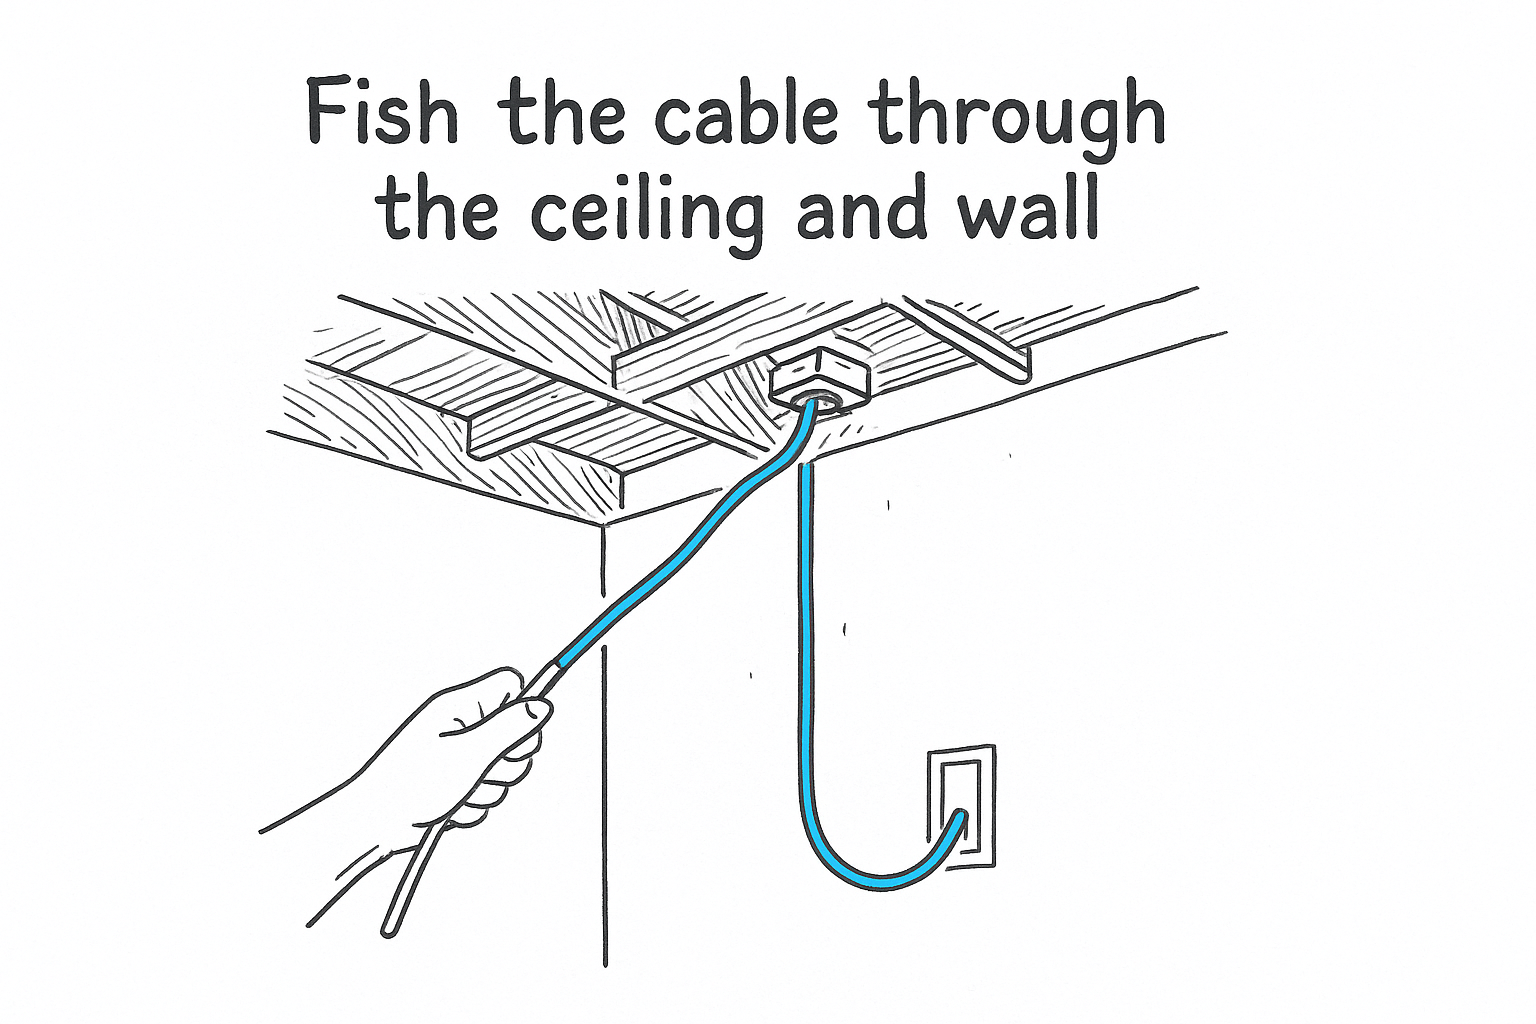
Keep at least 12 inches of cable slack at both ends, at the fan box and at the switch opening, so you have enough wire to make clean, secure connections.
Secure the cable every 4.5 feet along any exposed run in the attic using cable staples, and keep staples within 12 inches of each box entry. Avoid stapling so tightly that you crush the cable jacket, which damages the insulation inside. Pass the cable through the knockout on your fan-rated box from Step 2, leaving at least 6 inches of wire inside the box.
Choose and wire the wall switch
For a basic ceiling fan with no light kit, a standard single-pole switch is all you need at the wall. If your fan includes a light kit and you want independent control over the fan and the light, use a double-gang switch box with two single-pole switches and run 14/3 NM cable between the fan box and the switch location instead of 14/2. The red conductor in 14/3 gives you the second switched hot wire required for split control.
Cut the switch box opening at the correct height, typically 48 inches from the floor to the center of the box, which keeps it in line with other switches in the room. Secure a remodel switch box in the opening, pull your cable through the built-in clamp, and tighten the clamp firmly before moving to the next step.
Step 4. Connect the wiring, hang the fan, and test
With your cable run complete and your switch box in place, you’re ready to make the electrical connections that pull the whole project together. This step is where careful wire prep separates a clean, safe install from one that fails its first test. Strip roughly 3/4 inch of insulation from each conductor using wire strippers, and confirm no nicks or cuts appear on the wire beneath the jacket before you connect anything.
Make the wiring connections at the fan box
Most ceiling fans ship with a wiring diagram inside the canopy, and that diagram is the reference you follow, not generic instructions. Lay the fan bracket on the brace and thread the downrod through the canopy before you start connecting wires. The general connection order for a standard fan without a light kit runs as follows:
- Black (hot) from cable connects to the black fan wire
- White (neutral) from cable connects to the white fan wire
- Bare copper or green (ground) from cable connects to the green fan wire or ground screw on the bracket
- Twist each pair together using wire nuts, then wrap each nut with electrical tape for a secure hold
Double-check that no bare copper conductor is exposed outside any wire nut before you tuck the wires into the box.
Move to the wall switch next and connect the incoming hot black wire to one terminal and the switched hot wire running to the fan to the other terminal. Connect the white wires together with a wire nut since they pass through the switch without interruption, and attach the ground wire to the green screw on the switch body.
Hang the fan and run the final test
Follow the manufacturer’s bracket and canopy instructions to mount the fan motor housing to the brace you installed in Step 2. Secure all screws firmly and attach the blades according to the numbered sequence in the manual to keep the fan balanced. Once everything is assembled, restore power at the breaker and test each fan speed setting and, if your model includes a light kit, verify the light functions independently.
Reaching this point is a genuine milestone when working through how to install a ceiling fan without existing wiring, because a working fan confirms the full circuit runs correctly from your power source through the switch and out to the fixture.
Fix common issues and know when to call a pro
Even a well-executed install sometimes produces unexpected results on the first test. The problems that surface at this stage are almost always fixable without opening the ceiling again, provided you work through them methodically. Check the obvious causes first before you assume something is seriously wrong.
Common problems and how to fix them
If the fan doesn’t turn on at all, go back to the breaker and confirm it’s fully reset to the on position. A breaker that tripped during the install may sit in a middle position that looks on but isn’t. If the breaker is fine, use your non-contact voltage tester at the switch box to verify power is reaching the incoming hot wire. No voltage there means the issue is upstream of the switch, not at the fan itself.
If voltage reaches the switch but the fan still won’t run, the problem is almost always a loose wire nut or an incorrect connection at the fan box.
A fan that wobbles during operation usually has uneven blade weight or a loose blade bracket screw. Shut the fan off, tighten every blade bracket screw, and run it again. If the wobble continues, blade balancing kits are inexpensive and widely available. A humming or buzzing sound at any speed typically points to a dimmer switch wired in place of a standard single-pole switch. Ceiling fans require switches rated for fan loads, not light dimmers, and swapping to the correct switch type resolves the hum in most cases.
When to call a licensed electrician
Some situations that come up during how to install a ceiling fan without existing wiring go beyond the scope of safe DIY work. If your home has aluminum wiring, cloth-wrapped knob-and-tube cable, or a panel that hasn’t been serviced in years, stop and call a licensed electrician before you connect anything. Tying into outdated or deteriorated wiring without proper evaluation is a fire risk no ceiling fan is worth taking.
You should also call a pro if your install requires a new dedicated circuit at the panel, if your permit requires a licensed inspection sign-off, or if you’ve reached the wiring steps and aren’t fully confident in what you’re doing. AZ DC Electric serves homeowners across the Phoenix Metro Area and can take over any stage of the project, from a full install to finishing the final connections safely.
Quick wrap-up and what to do next
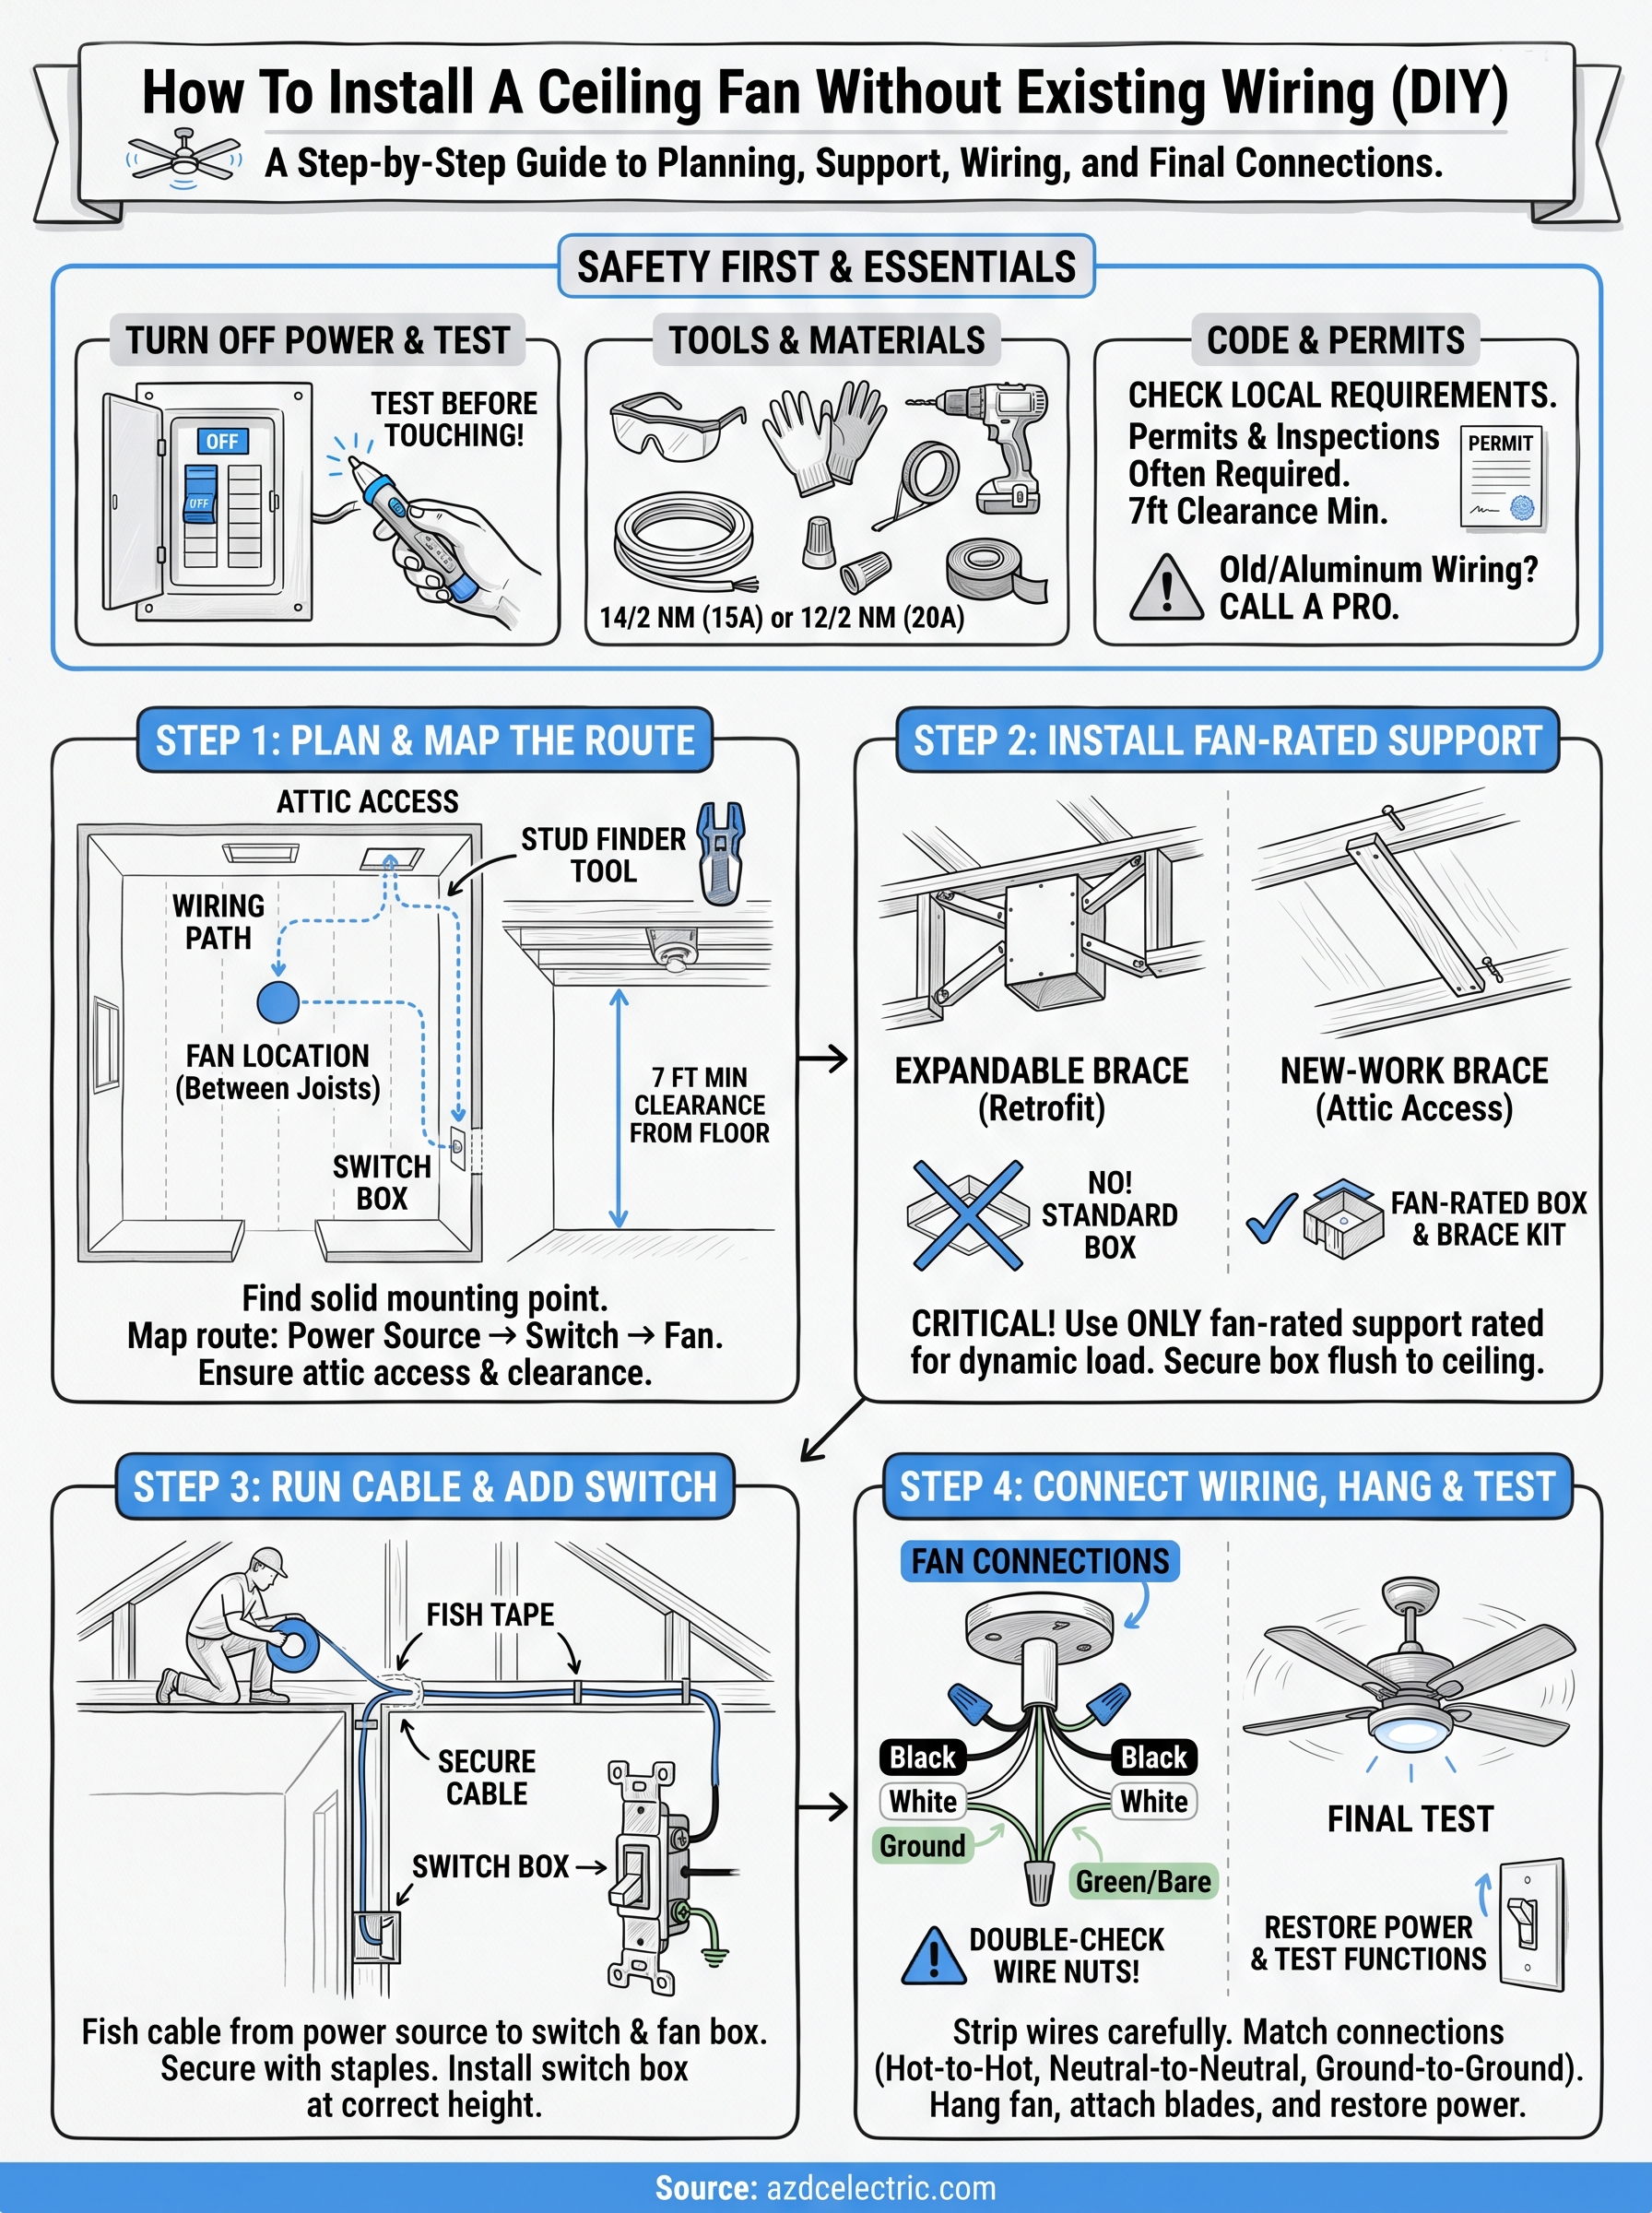
Knowing how to install a ceiling fan without existing wiring comes down to four things done in the right order: picking a solid location, installing a fan-rated brace and box, running cable to both the fan and the switch, and making clean, correct connections before powering up. Each step builds on the one before it, so skipping ahead or rushing the planning phase creates problems that surface later and take longer to fix.
If you worked through every step and your fan is running smoothly, the job is done. If you hit aluminum wiring, needed a new circuit, or reached the panel work and weren’t comfortable continuing, that’s a clear sign to bring in a licensed electrician. AZ DC Electric handles ceiling fan installs across the Greater Phoenix Metro Area, including jobs with no existing wiring. Request a ceiling fan installation quote and get your project finished safely.