Figuring out how many recessed lights do I need is one of those questions that seems simple until you’re staring at a blank ceiling with a tape measure. Too few lights and you end up with dark corners and uneven coverage. Too many and the room feels like a showroom, plus you’ve spent money you didn’t need to.
The answer depends on a few straightforward factors: room size, ceiling height, the type of trim you choose, and what you actually do in that space. A kitchen needs significantly more light than a bedroom. A hallway has different requirements than a living room. Once you understand the basic formula and spacing rules, planning a layout gets much less intimidating.
At AZ DC Electric, we install recessed lighting across the Greater Phoenix Metro Area for homeowners doing everything from single-room upgrades to full remodels. We see the same mistakes repeat, lights too close together, mismatched color temperatures, or layouts that ignore furniture placement entirely. This guide walks you through the math, spacing recommendations, and layout strategies we use on actual jobs so you can plan your project with confidence before a single hole gets cut in your ceiling.
What affects how many recessed lights you need
Before you can answer how many recessed lights do I need, you need to understand the variables that drive the number. These aren’t complicated, but skipping any one of them leads to layouts that either look off or don’t perform the way you expected. Four main factors control how many fixtures you need: room size, ceiling height, how you use the space, and the technical specs of the fixture itself.
Room size and ceiling height
Room square footage is the starting point for every recessed lighting calculation. A larger room needs more fixtures to maintain even coverage, and you can’t just scale one number up without adjusting the others. Ceiling height changes the math significantly because light spreads out as it travels downward. A standard 8-foot ceiling keeps the beam fairly concentrated, while a 10-foot or 12-foot ceiling means each fixture covers a wider area but delivers less intensity at floor level.
A fixture that works perfectly at 8 feet will leave noticeable dim spots in a room with 10-foot ceilings unless you add more lights or switch to a wider beam angle.
Vaulted or coffered ceilings add another layer of complexity because the angle of the ceiling surface affects both where you can physically place fixtures and how the light hits the walls and floor below. These ceiling types almost always require custom spacing rather than a standard grid.
The purpose of the space
What you do in a room determines how much light you actually need. A kitchen or home office requires bright, even task lighting across most of the ceiling. A bedroom or living room typically calls for lower ambient light with the option to increase brightness through dimmers. These differences mean two rooms of identical size can require very different numbers of fixtures.
Spaces with specific work zones, like a kitchen island or a bathroom vanity, often need dedicated recessed fixtures aimed directly at those areas in addition to general overhead lighting. Treating every room the same way is one of the most common planning mistakes that leads to a lighting layout that feels wrong even when the numbers look right on paper.
Trim style, beam angle, and bulb type
The fixture itself plays a large role in how far light reaches across a room. Recessed trims come in different styles: open trims cast a wider, more diffuse light, while eyeball or directional trims concentrate the beam on a specific area. Each trim type produces a different spread pattern, which directly affects how many fixtures you need to cover the floor evenly.
Beam angle is the spec most people overlook when planning a layout. A narrow beam angle of around 25 degrees produces a focused spotlight effect, while a wide beam angle of 60 degrees or more floods a much broader area. Using wide-beam bulbs lets you space fixtures farther apart without creating dark zones between them.
The lumen output of your chosen bulb matters just as much as the fixture count because two layouts with the same number of lights can produce very different results depending on bulb brightness. The table below shows how coverage diameter changes with beam angle at common ceiling heights, which helps you match the right bulb to the right room before you commit to a layout.
| Beam Angle | Coverage at 8 ft ceiling | Coverage at 10 ft ceiling |
|---|---|---|
| 25° (narrow) | ~3 ft diameter | ~4 ft diameter |
| 40° (medium) | ~5 ft diameter | ~7 ft diameter |
| 60° (wide) | ~8 ft diameter | ~11 ft diameter |
Step 1. Measure the room and define zones
Accurate measurements are the foundation of any recessed lighting layout. Before you can answer how many recessed lights do I need, you need exact dimensions, not estimates. Pull out a tape measure and record the length, width, and ceiling height of the room. Write these numbers down because you’ll reference them in every calculation that follows.
How to measure the room accurately
Start by measuring wall to wall at floor level, and note any alcoves, bay windows, or bump-outs separately. These areas often get their own dedicated fixtures rather than sharing the main grid. Ceiling height is best measured from a corner where the wall meets the ceiling using a tape measure or a laser distance tool.
Use this simple template to record your room data before you move on:
Room name: ___________________
Length: ________ ft
Width: ________ ft
Square footage (L x W): ________ sq ft
Ceiling height: ________ ft
Special features (island, alcove, etc.): ___________________
Measuring each zone separately, rather than treating the entire floor plan as one number, gives you a lighting plan that actually matches how you use the space.
Define your lighting zones
Once you have your room dimensions, divide the space into functional zones based on how each area gets used. A kitchen might have three distinct zones: general ceiling coverage, a dedicated island zone, and an area over the sink. Each zone may need a different fixture count, spacing distance, or beam angle to do its job properly.
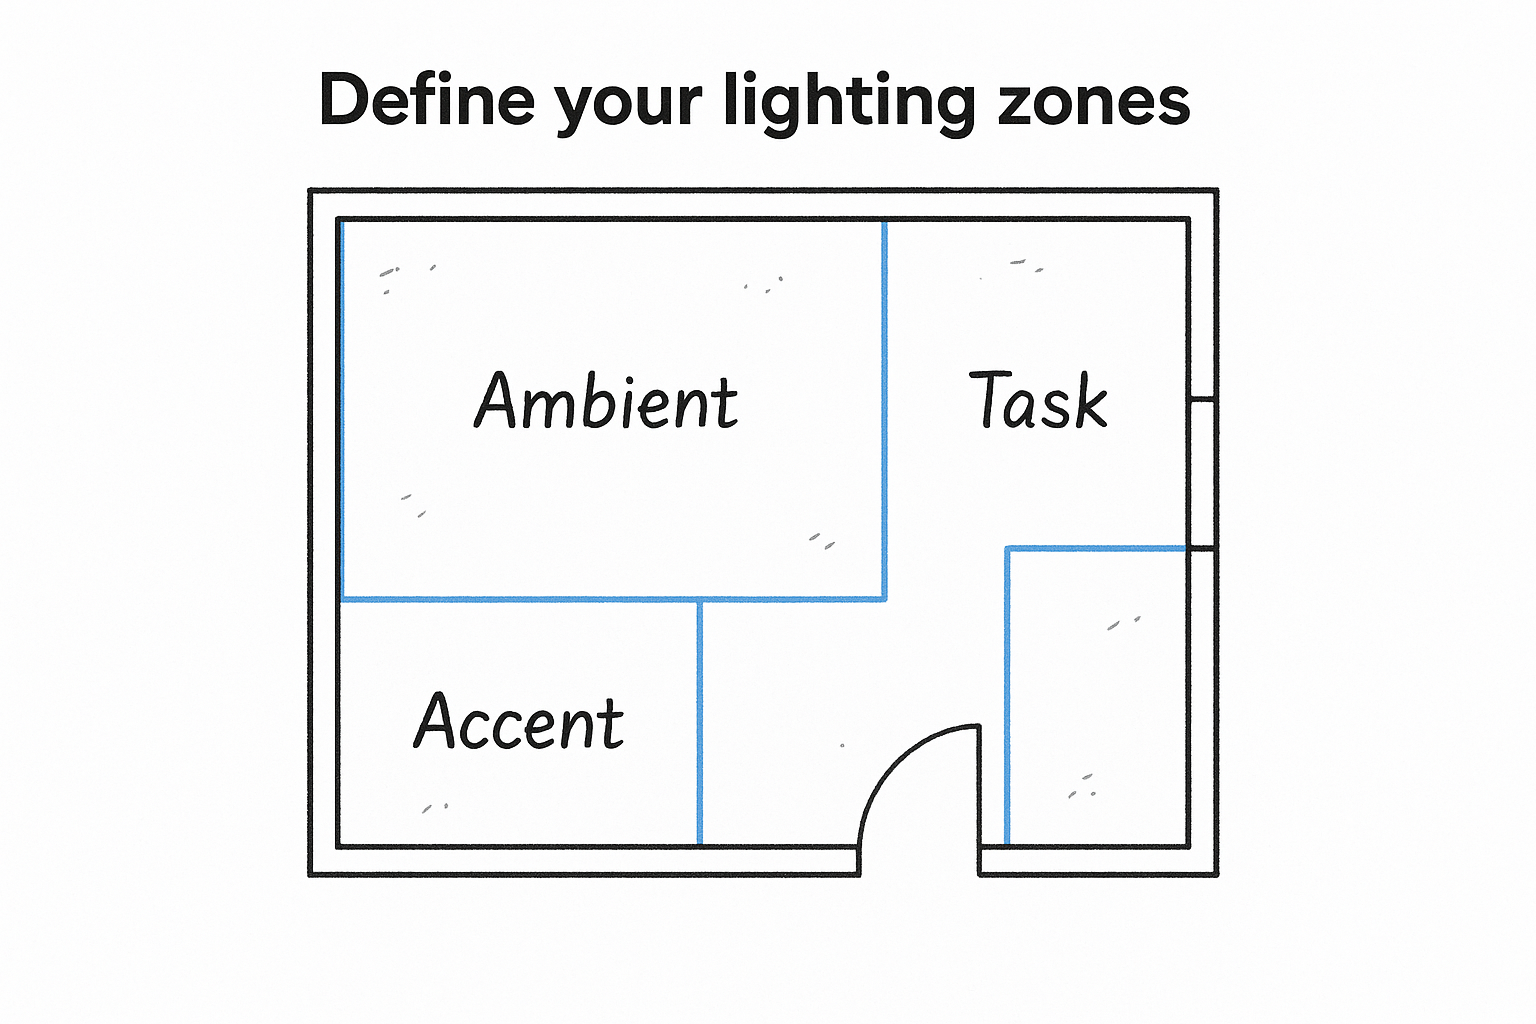
Mark your zones on a rough floor plan sketch, even a hand-drawn one on grid paper works fine. Label each zone with its primary function, such as ambient, task, or accent, because that label determines the lumen target you’ll set in the next step. A dining area where you want soft, adjustable light gets treated differently than a workbench area where you need consistent bright output. Splitting the room into zones at this stage prevents you from applying a single blanket calculation to a space that actually has multiple different lighting needs.
Step 2. Choose your lighting goal and brightness
Before you run any numbers on how many recessed lights do I need, you need to decide what the lighting is supposed to do. Every fixture you place has a job, and the number of fixtures you need changes significantly depending on whether that job is general illumination, focused task lighting, or decorative accent work. Getting this step wrong means you can nail the math and still end up with a layout that feels flat or overlit.
Identify your lighting purpose for each zone
Each zone you defined in Step 1 falls into one of three categories: ambient, task, or accent. Ambient lighting provides general background illumination for the whole room. Task lighting delivers focused brightness to a specific work surface like a countertop, desk, or reading chair. Accent lighting highlights architectural features, artwork, or other visual points of interest.
Treating an entire room as a single ambient zone is the fastest way to end up with bright spots over the center of the room and dark, unusable corners along the walls.
Most rooms use a combination of at least two categories. A kitchen might need ambient coverage across the main ceiling plus dedicated task fixtures over the island and sink. A living room might use ambient recessed lights on a dimmer with a few accent fixtures aimed at a fireplace or bookshelf wall.
Match lumen targets to room type
Once you know the purpose of each zone, you can assign a lumen-per-square-foot target to it. Lumens measure actual light output, not wattage, and this number drives how many fixtures you need at your chosen bulb brightness.
The table below gives you practical lumen targets for common residential spaces:
| Room Type | Lighting Goal | Lumens per Square Foot |
|---|---|---|
| Kitchen (general) | Ambient | 30-40 |
| Kitchen (task/island) | Task | 70-80 |
| Living room | Ambient | 10-20 |
| Bedroom | Ambient | 10-20 |
| Bathroom | Ambient + Task | 70-80 |
| Home office | Task | 50-70 |
| Hallway | Ambient | 5-10 |
Multiply your zone square footage by the lumen target to get the total lumen output you need from that zone. For example, a 120-square-foot kitchen needs between 3,600 and 4,800 lumens for general ambient coverage. You’ll use this total in Step 3 to calculate how many fixtures actually deliver that output.
Step 3. Calculate light count with two methods
Now that you have your room dimensions and lumen targets from Steps 1 and 2, you can answer how many recessed lights do I need with actual numbers. Two methods give you this answer: a quick square footage formula for rough estimates, and a more precise lumen-based calculation that accounts for your specific bulb brightness. Running both and comparing the results is worth the extra few minutes because the two numbers together give you a reliable target range instead of a single figure you have to guess at.
Method 1: The square footage formula
This method gives you a fast ballpark number and works well for standard rooms with 8-foot ceilings. Divide your room square footage by 20 to get the minimum number of recessed fixtures needed for basic ambient coverage. For ceilings higher than 8 feet, divide by a smaller number instead, since each fixture covers a wider floor area but delivers less intensity at that greater distance.
Use this template to run the calculation quickly:
Room square footage: ________ sq ft
Ceiling height: ________ ft

If 8 ft ceiling:  sq ft ÷ 20 = ________ lights
If 10 ft ceiling: sq ft ÷ 15 = ________ lights
If 12 ft ceiling: sq ft ÷ 12 = ________ lights

Estimated fixture count: ________
This formula gives you a starting point, not a final answer. Unusual room shapes, furniture placement, and mixed lighting zones all push the real number higher than this baseline.
Method 2: The lumen-based calculation
This method is more precise because it ties fixture count directly to the actual light output your chosen bulb delivers rather than just room size alone. Divide your total lumen target (calculated in Step 2) by the lumens produced by your chosen bulb to get the exact number of fixtures needed for each zone.
Here is the formula with a worked example:
Total lumens needed (from Step 2): ________ lm
Lumens per bulb (check bulb spec sheet): ________ lm

Fixture count = Total lumens needed ÷ Lumens per bulb

Example:
Kitchen ambient target: 4,200 lm
Bulb output: 800 lm each
Fixture count = 4,200 ÷ 800 = 5.25 → round up to 6 fixtures
Always round up rather than down when you get a decimal result. A slightly over-lit room is far easier to manage with a dimmer than a room that consistently falls short of your target brightness.
Step 4. Set spacing and wall offsets
Knowing how many recessed lights do I need only gets you halfway to a finished plan. Once you have your fixture count, you need to place those fixtures at the right distances from each other and from the walls. Spacing and wall offsets work together to eliminate dark zones, prevent hot spots, and give the room an even, balanced look from every angle.
Calculate spacing between fixtures
The standard rule for spacing recessed lights is to divide your ceiling height in half to get the maximum distance between fixtures. For an 8-foot ceiling, place fixtures no more than 4 feet apart. For a 10-foot ceiling, you can stretch that to 5 feet. This rule applies to ambient-focused layouts where even floor coverage is the main goal.
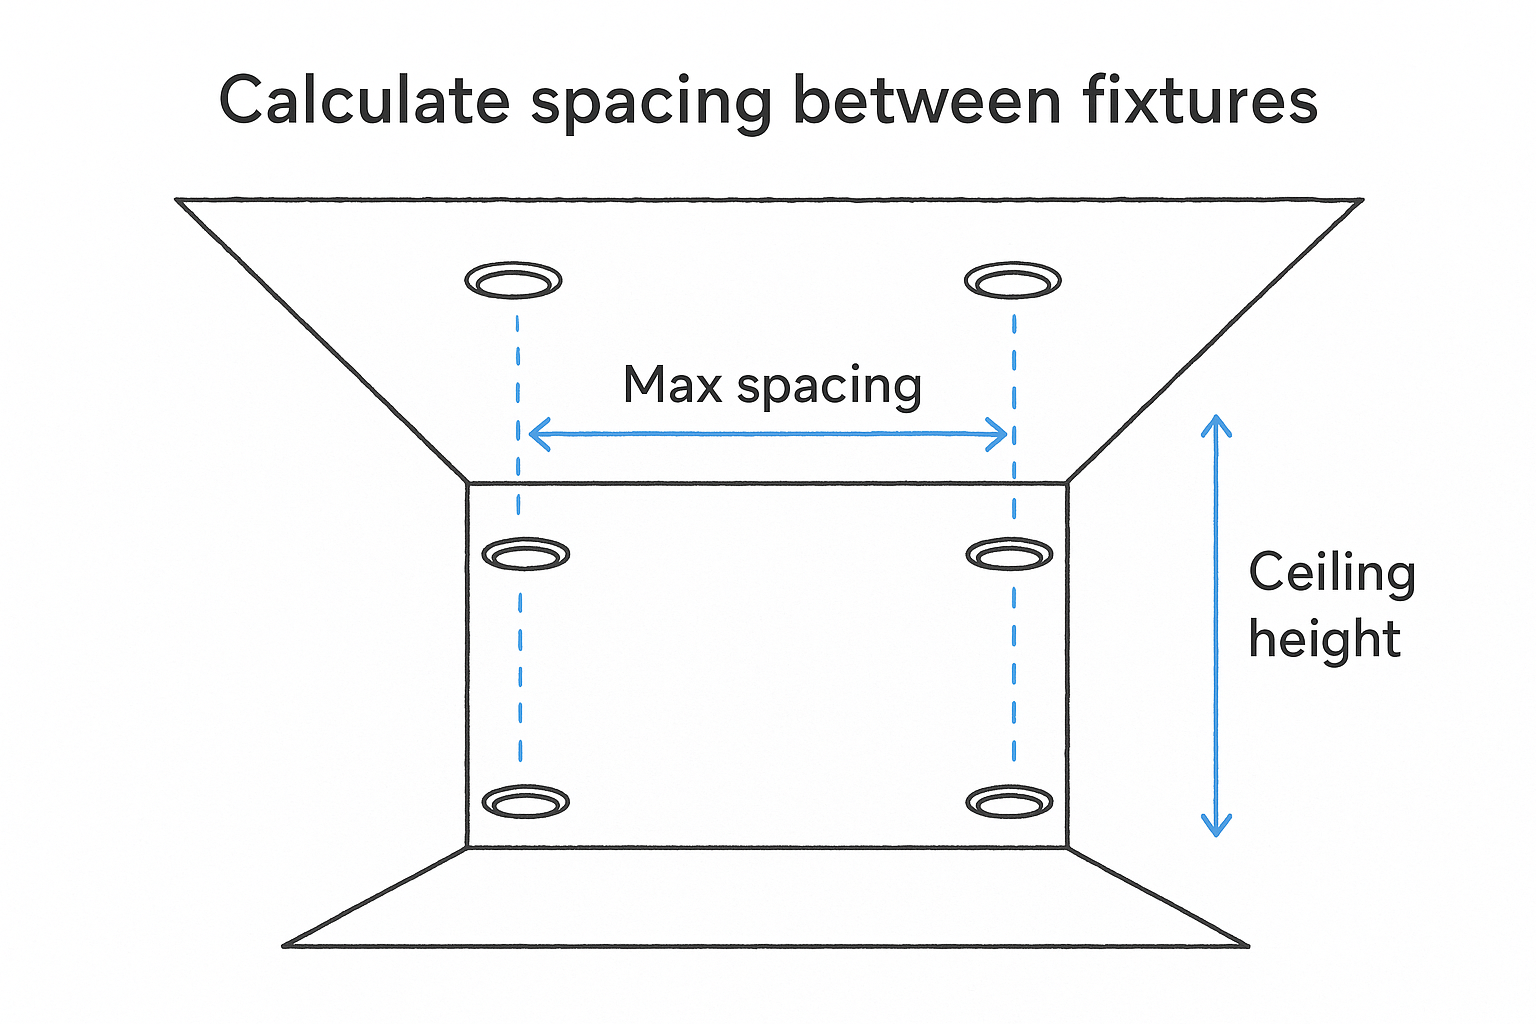
Tighter spacing produces more overlap between beams, which smooths out contrast between lit and unlit areas and reduces shadows under furniture or cabinets.
Use this template to calculate your grid spacing before you mark any positions on the ceiling:
Ceiling height: ________ ft
Max spacing (ceiling height ÷ 2): ________ ft

Room length: ________ ft
Room width: ________ ft

Columns (length ÷ spacing): ________ fixtures
Rows (width ÷ spacing): ________ fixtures

Total grid fixtures: columns × rows = ________
Compare this grid total against the fixture count you calculated in Step 3. If the numbers are close, your layout is on track. If the grid total is significantly higher, consider using a wider beam angle bulb so you can space fixtures farther apart without sacrificing coverage.
Set your wall offsets
Wall offset is the distance between the center of your first fixture and the nearest wall. Setting this correctly prevents the edges of the room from going dark while also keeping light from washing directly down the wall surface in a way that highlights imperfections in the drywall.
For general ambient lighting, place your first row of fixtures 2 feet from the wall. For task lighting over counters or work surfaces, bring that offset in to 1.5 feet so the beam lands on the actual work area rather than behind it. If you plan to use any fixtures as wall-wash accent lights, tighten the offset to 12 to 18 inches and aim the trim directly at the wall surface.
| Lighting Purpose | Recommended Wall Offset |
|---|---|
| General ambient | 2 ft from wall |
| Task (counters, desks) | 1.5 ft from wall |
| Wall wash / accent | 12-18 inches from wall |
Step 5. Build a layout that avoids shadows
A fixture count and spacing grid answer how many recessed lights do I need, but they don’t automatically tell you where to put each light relative to what’s actually in the room. Shadows appear when beams stop at furniture edges, when fixtures are placed symmetrically on the ceiling without regard to the floor below, or when walls at the perimeter of the room receive no direct light at all. Placing lights to counter these shadow sources, rather than just filling in a clean grid, is what separates a layout that looks polished from one that feels dim and patchy.
Account for furniture and obstacles
Furniture position directly affects where shadows form in a finished room. A sofa placed against a wall blocks the beam from any fixture centered over the middle of the room, leaving the seating area darker than the open floor around it. Before you finalize any fixture positions, sketch your furniture layout on the same floor plan you used for your zones in Step 1.
Place at least one fixture within 18 to 24 inches of the front edge of any large piece of furniture so the beam lands on the surface rather than stopping at the back of it.
Use the checklist below to review your layout against common shadow-causing obstacles before you commit to any ceiling positions:
- Large sofas or sectionals: place a fixture over the seating area, not just the open floor beside it
- Kitchen islands: confirm at least one fixture is centered directly above the work surface
- Beds: position a fixture at the foot of the bed rather than over the center of the mattress
- Bookcases or tall cabinets: add a fixture angled toward the face of the unit if accent detail matters
Use a staggered grid for irregular rooms
Rectangular rooms with standard proportions respond well to a clean row-and-column grid, but L-shaped rooms, rooms with angled walls, or open floor plans with partial walls require a different approach. A staggered grid offsets every other row by half the standard spacing interval, which fills in the diagonal gaps that a straight grid leaves uncovered.
To apply a staggered grid, calculate your standard row spacing from Step 4, then shift every second row of fixtures left or right by half that distance. In a room with 4-foot spacing, your second row starts at 2 feet from the side wall instead of flush with the first row. This pattern breaks up the rigid visual line of a standard grid and delivers more consistent coverage across corners and angles where shadows tend to collect.
Step 6. Adjust for ceilings, trims, and bulbs
Your spacing grid and fixture count from the previous steps assume a flat, standard-height ceiling with a basic open trim and a medium-output bulb. Real rooms rarely fit that assumption exactly. Vaulted ceilings, sloped surfaces, specialty trims, and bulb variables all shift your numbers, so you need to revisit your plan once you know the specific products you’re installing. This is the step where how many recessed lights do I need gets its final answer before anything goes on a purchase list.
Adjust for ceiling type and height
Sloped and vaulted ceilings require adjustable-angle fixtures rather than standard vertical-mount housings. If you install a fixed housing on a sloped ceiling, the beam angles away from the floor rather than straight down, which wastes output and creates uneven coverage. Adjustable gimbal trims let you redirect the beam to compensate for the ceiling angle and keep light landing where you actually need it.
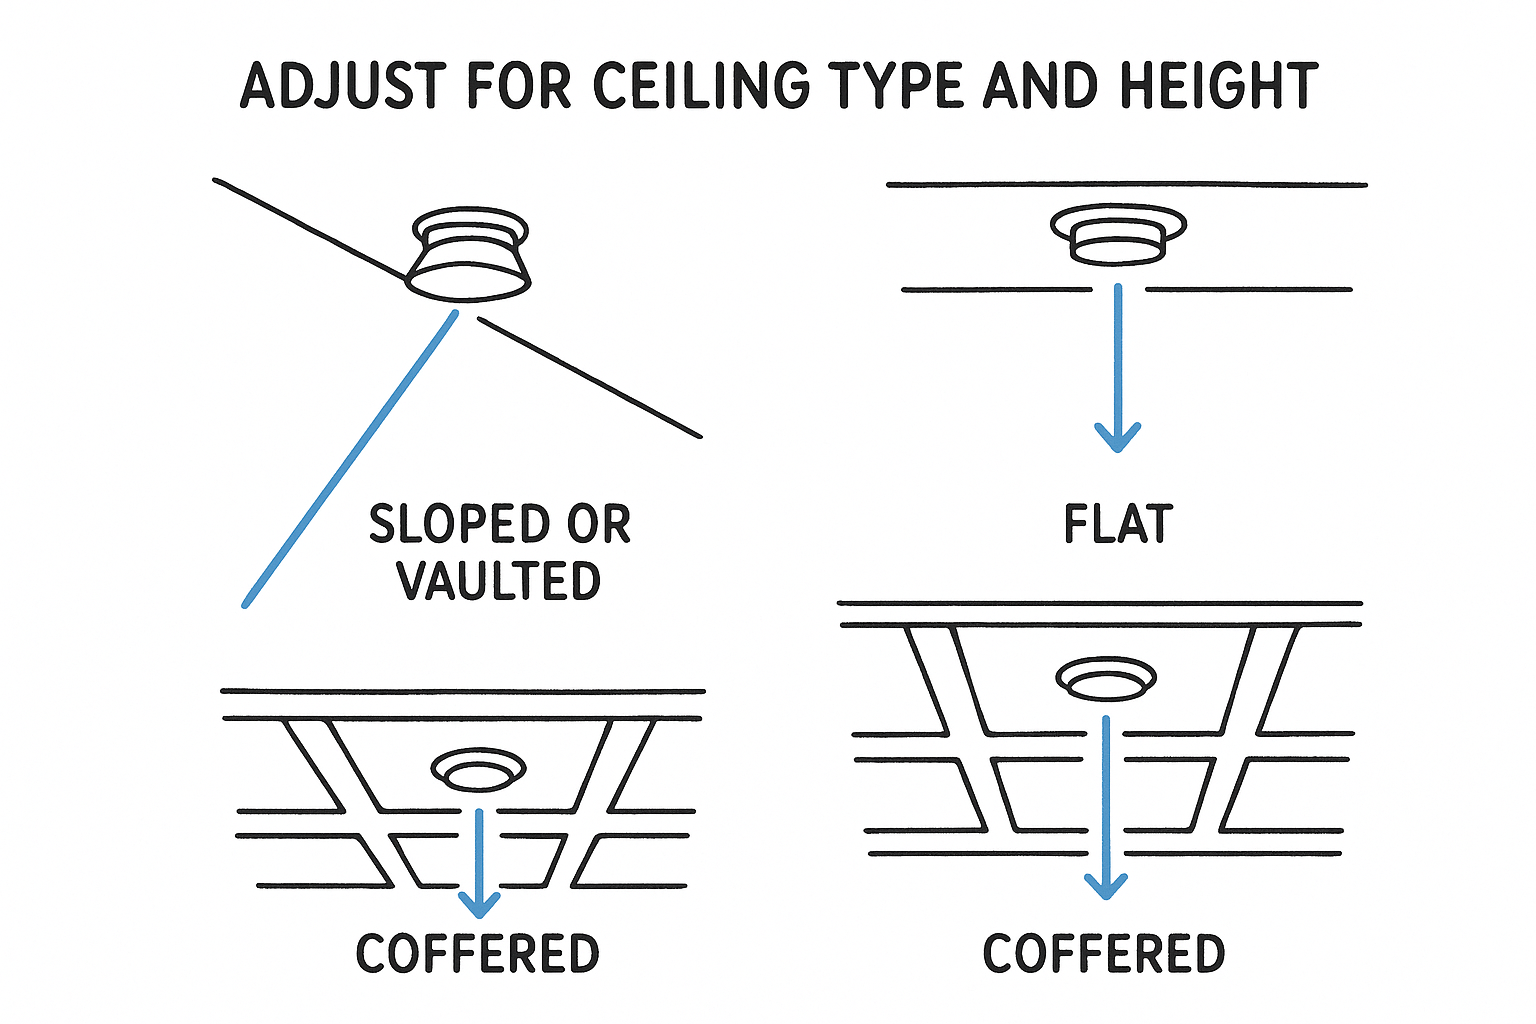
On a ceiling with a pitch steeper than 3-in-12, reduce your standard spacing by about 15 percent to compensate for the beam deflection caused by the angle.
The ceiling material also affects how many fixtures your plan needs. Coffered or tray ceilings with recessed panels often require fixtures placed inside each coffer bay rather than on a shared grid, which increases total fixture count significantly compared to a flat ceiling calculation. Use the adjustment table below to scale your baseline count to match your ceiling type:
| Ceiling Type | Spacing Adjustment |
|---|---|
| Flat, 8 ft | No adjustment needed |
| Flat, 10-12 ft | Reduce spacing by 10-15% |
| Vaulted or sloped | Reduce spacing by 15-20% |
| Coffered or tray | Plan per bay, not per grid |
Match trim and bulb to your layout
Trim style and bulb beam angle work together, so finalize both at the same time rather than choosing them separately. An open baffle trim paired with a 60-degree wide-beam bulb pushes the most light across the floor and suits rooms where even ambient coverage is the priority. A reflector trim with a 40-degree bulb concentrates more output downward and works better for task zones like kitchen counters or reading areas.
Lumen output per bulb determines whether your calculated fixture count actually hits your target brightness. Pull the lumen rating directly from the bulb spec sheet, not the wattage equivalency label, and plug it back into the lumen-based formula from Step 3. If the number changes, adjust your fixture count before you finalize your layout.
Step 7. Plan switches, dimmers, and circuits
Once you’ve finalized your fixture count and layout, you need to decide how those lights get controlled. The electrical side of any recessed lighting project directly affects how your layout performs in daily use, and skipping this step means you could end up with a perfectly calculated answer to how many recessed lights do I need but a control setup that makes the space frustrating to use. Switches, dimmers, and circuits need to match your fixture types and your zone structure.
Choose the right dimmer for your fixtures
Not every dimmer works with every bulb, and installing the wrong combination causes flickering, buzzing, or premature bulb failure. LED recessed lights require an LED-compatible dimmer, not a standard incandescent dimmer. Check the compatibility list printed on the dimmer packaging or available on the manufacturer’s product page before you buy anything.
Pairing a non-compatible dimmer with LED fixtures is one of the most common reasons a newly installed recessed lighting layout flickers at low brightness settings.
The table below shows which dimmer type matches each common bulb category:
| Bulb Type | Required Dimmer |
|---|---|
| LED (most common) | LED/CFL-compatible dimmer |
| Incandescent or halogen | Standard incandescent dimmer |
| Smart bulbs (WiFi/Zigbee) | Smart switch or no dimmer (app-controlled) |
Each lighting zone you defined in Step 1 should get its own dimmer circuit so you can adjust ambient, task, and accent lights independently. A kitchen with a single switch controlling both the general ceiling fixtures and the island task lights gives you far less control than two separate dimmers would.
Plan your circuits and switch locations
Circuit load determines how many fixtures you can safely run on a single breaker. A standard 15-amp residential circuit handles roughly 1,440 watts of continuous load at 80 percent capacity. Most LED recessed fixtures draw between 8 and 15 watts each, so you can typically run 60 to 90 LED fixtures on one circuit before you need an additional breaker. Use this template to check your load before finalizing:
Watts per fixture: ________ W
Number of fixtures on circuit: ________
Total load: ________ W (watts per fixture × fixture count)
Safe limit (15A circuit): 1,440 W
Safe limit (20A circuit): 1,920 W

Over limit? Yes / No → Add a second circuit if yes
Switch placement matters as much as circuit capacity. Place switches at every room entry point and at any transition between defined lighting zones so you never have to walk across a dark room to reach a control.
Next steps for your lighting plan
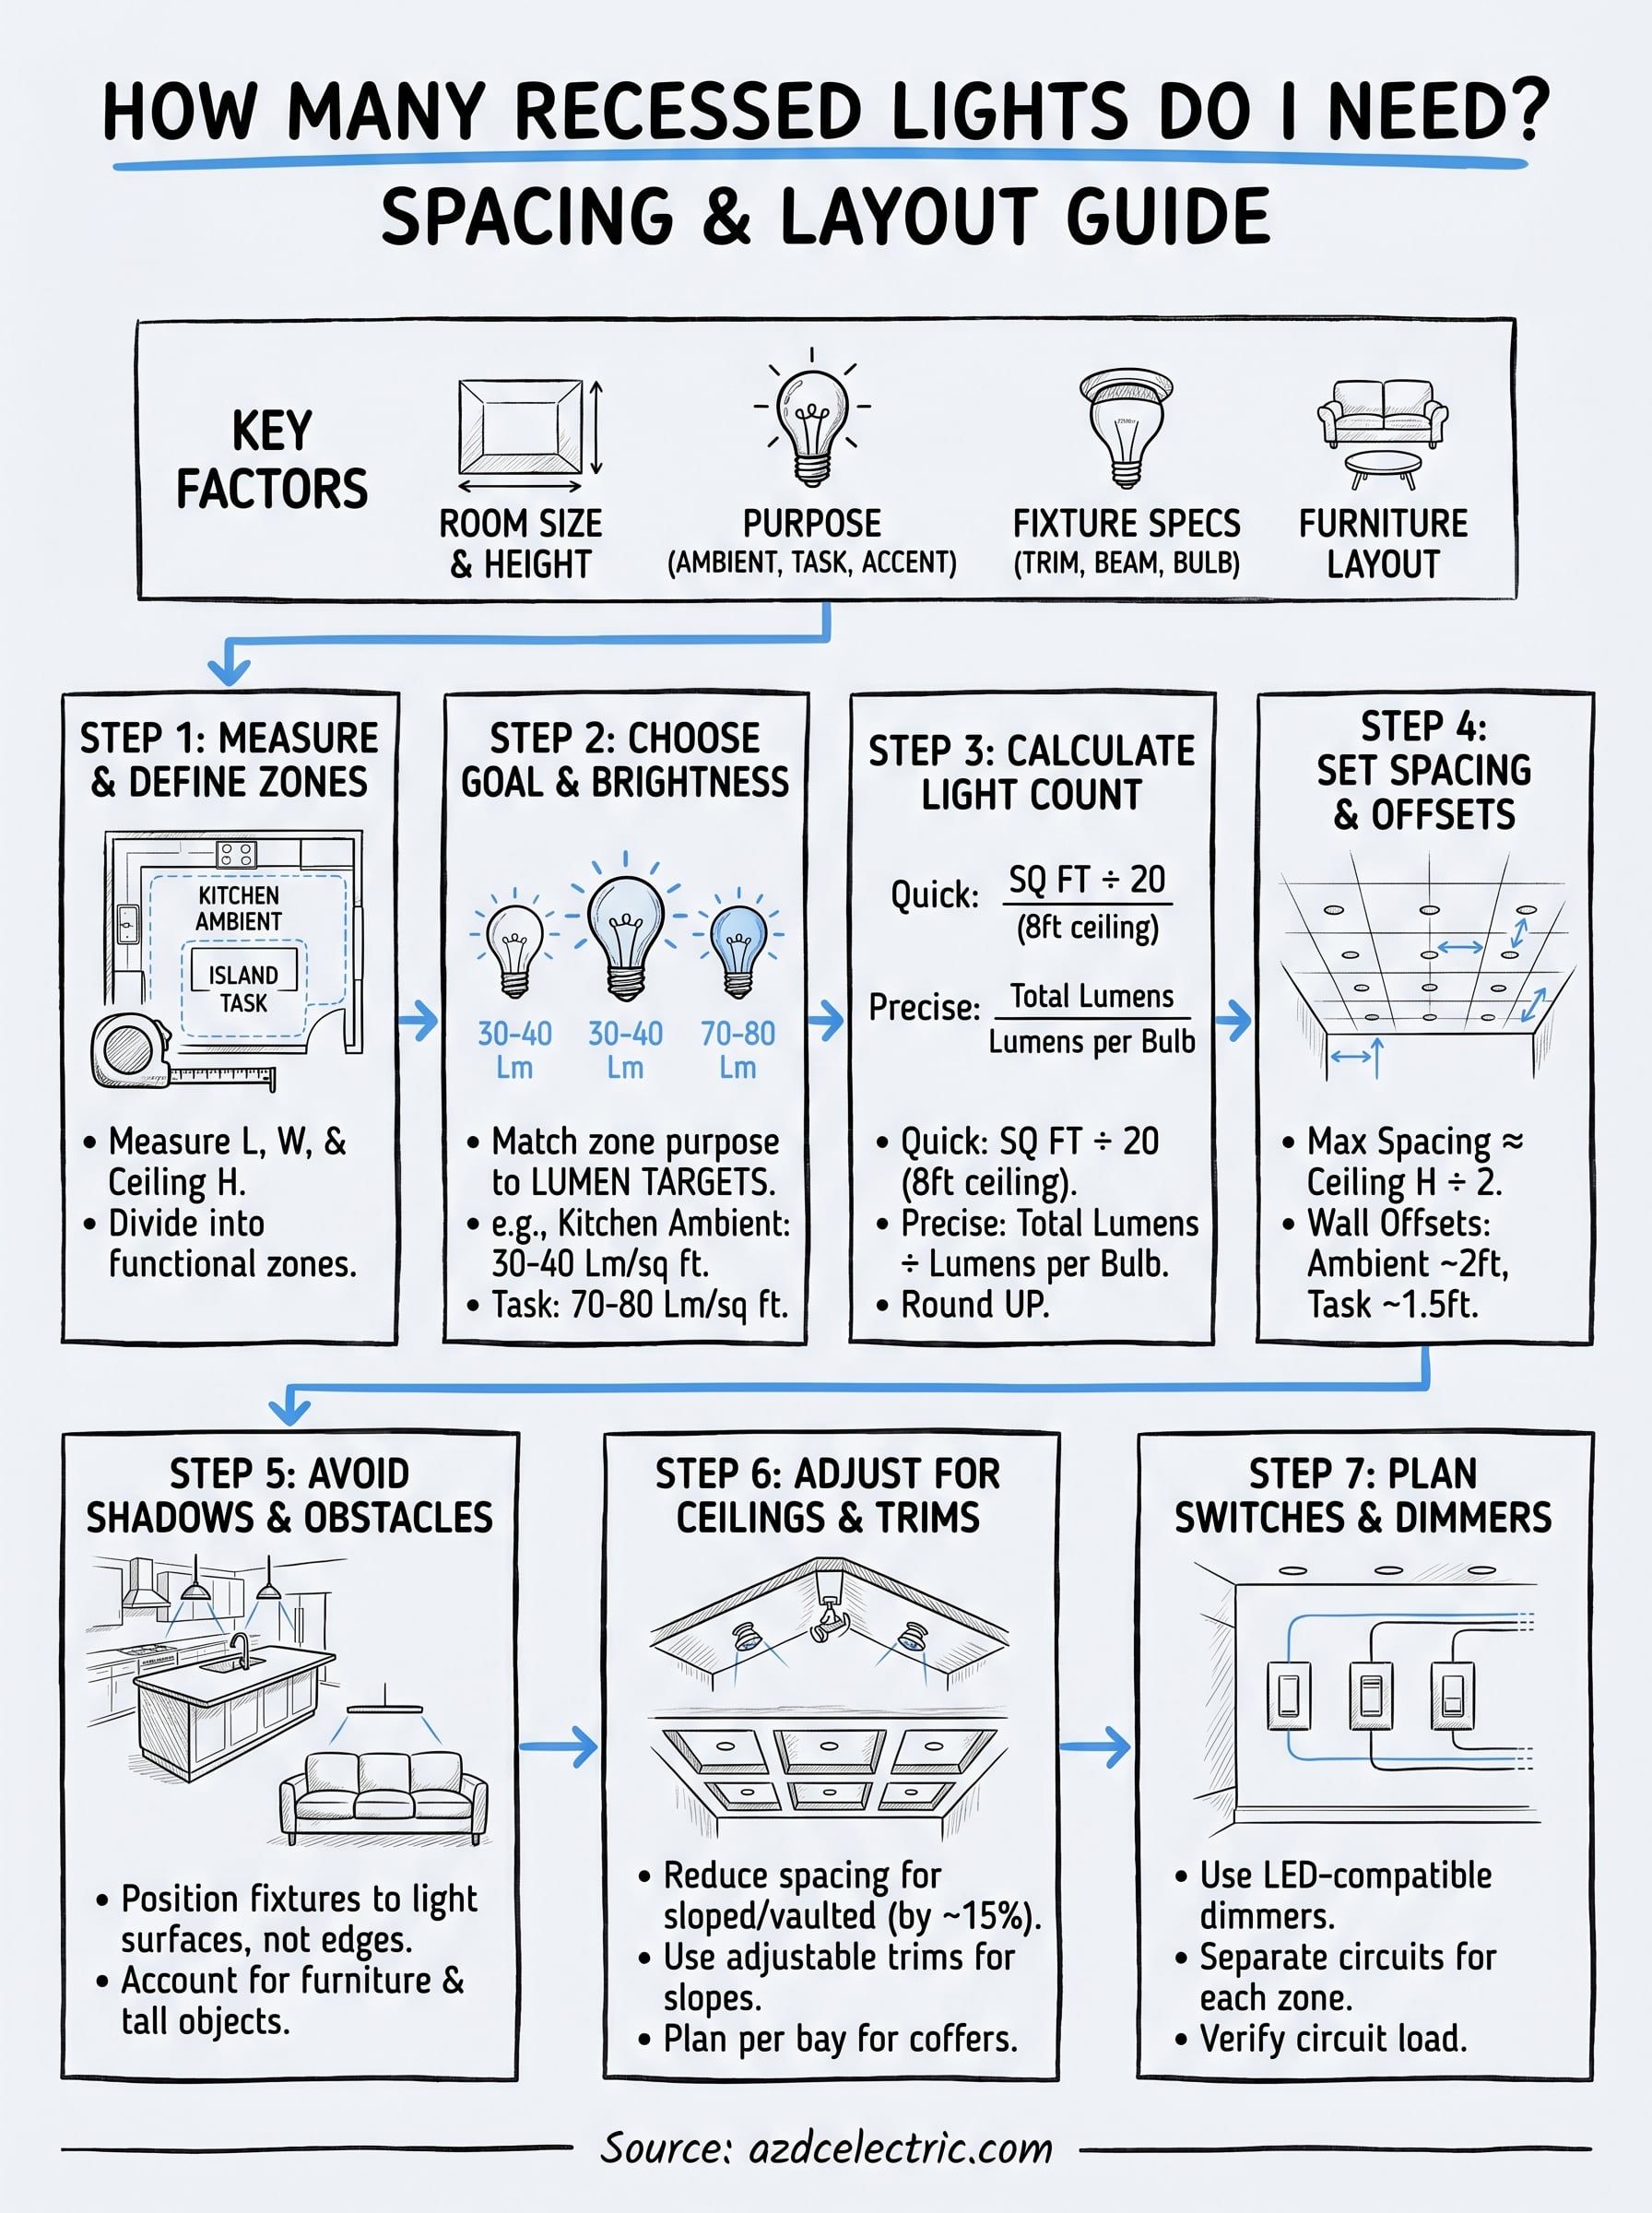
You now have a complete process for answering how many recessed lights do i need for any room in your home. Each step builds on the last, from room measurements and lumen targets to spacing grids, shadow-free layouts, and circuit planning. Pull your notes together into a single floor plan sketch before you buy a single fixture or cut a single hole.
Take that plan to a licensed electrician before work begins. Recessed lighting involves cutting into ceilings, running new wiring, and potentially adding breakers, all of which require permits and code compliance in Arizona. A professional review catches clearance conflicts, load issues, and placement errors that are far cheaper to fix on paper than after installation.
Ready to get your layout installed by a licensed team serving the Greater Phoenix Metro Area? Contact AZ DC Electric for upfront pricing and a 5-year workmanship guarantee on every job.