Installing a ceiling fan is one of those home projects that feels more intimidating than it actually is. With the right tools, a basic understanding of electrical wiring, and a clear set of ceiling fan installation instructions, most homeowners can get the job done in a couple of hours. Whether you’re replacing an old fixture or mounting a fan where one has never been, a step-by-step approach makes all the difference between a smooth install and a frustrating afternoon.
That said, ceiling fans involve electrical connections, and electrical work always carries risk if you’re not confident in what you’re doing. At AZ DC Electric, we handle ceiling fan installations across the Greater Phoenix Metro Area every week, so we know exactly where DIYers tend to run into trouble. We put this guide together to walk you through the full process honestly, from selecting the right mounting bracket to wiring and balancing the blades.
Below, you’ll find detailed instructions covering tools, materials, safety precautions, wiring diagrams, and common mistakes to avoid. If at any point the project feels beyond your comfort level, especially if your home has older wiring or no existing ceiling box, don’t hesitate to call in a licensed electrician. There’s no shame in knowing when to hand it off, and getting it done safely matters more than getting it done yourself.
What to know before you start
Before you open the box and start sorting hardware, a few key facts about your home’s wiring and ceiling structure will determine everything from which mounting hardware you need to whether this is a safe DIY project at all. Jumping into these ceiling fan installation instructions without this groundwork leads to mid-project problems, like discovering your electrical box can’t support the fan’s weight after you’ve already pulled down the old light fixture.
The single biggest reason ceiling fan installs go wrong is that homeowners skip the assessment phase and discover a problem only after the old fixture is already down.
Electrical basics you need to understand
You don’t need to be an electrician, but you do need to understand how ceiling fan wiring differs from a standard light fixture. A light fixture typically uses two wires: a hot (black) and a neutral (white), plus a ground (bare copper or green). A ceiling fan with a separate light kit may require a third conductor, the blue wire, to independently control the fan motor and the light. If your wall switch only has a two-wire cable running to the ceiling, you’ll either need to run a new wire, use a remote kit, or accept that both the fan and light will operate on one switch together.
Knowing your circuit’s amperage before you start matters more than most guides mention. Most ceiling fans run on a standard 15-amp circuit, which covers the large majority of residential setups. If you’re installing a large, high-wattage fan with a full light kit and adding it to a circuit already carrying a significant load, verify the circuit can handle it before you begin.
What your existing setup determines
Your current ceiling setup dictates which installation path you’ll follow. If you already have a working light fixture at the location, you have an existing electrical box, wiring, and a wall switch. That simplifies the job considerably. If there’s no fixture at all, you’re looking at running new wire from a panel or junction box, which moves this project firmly into licensed-electrician territory for most homeowners.
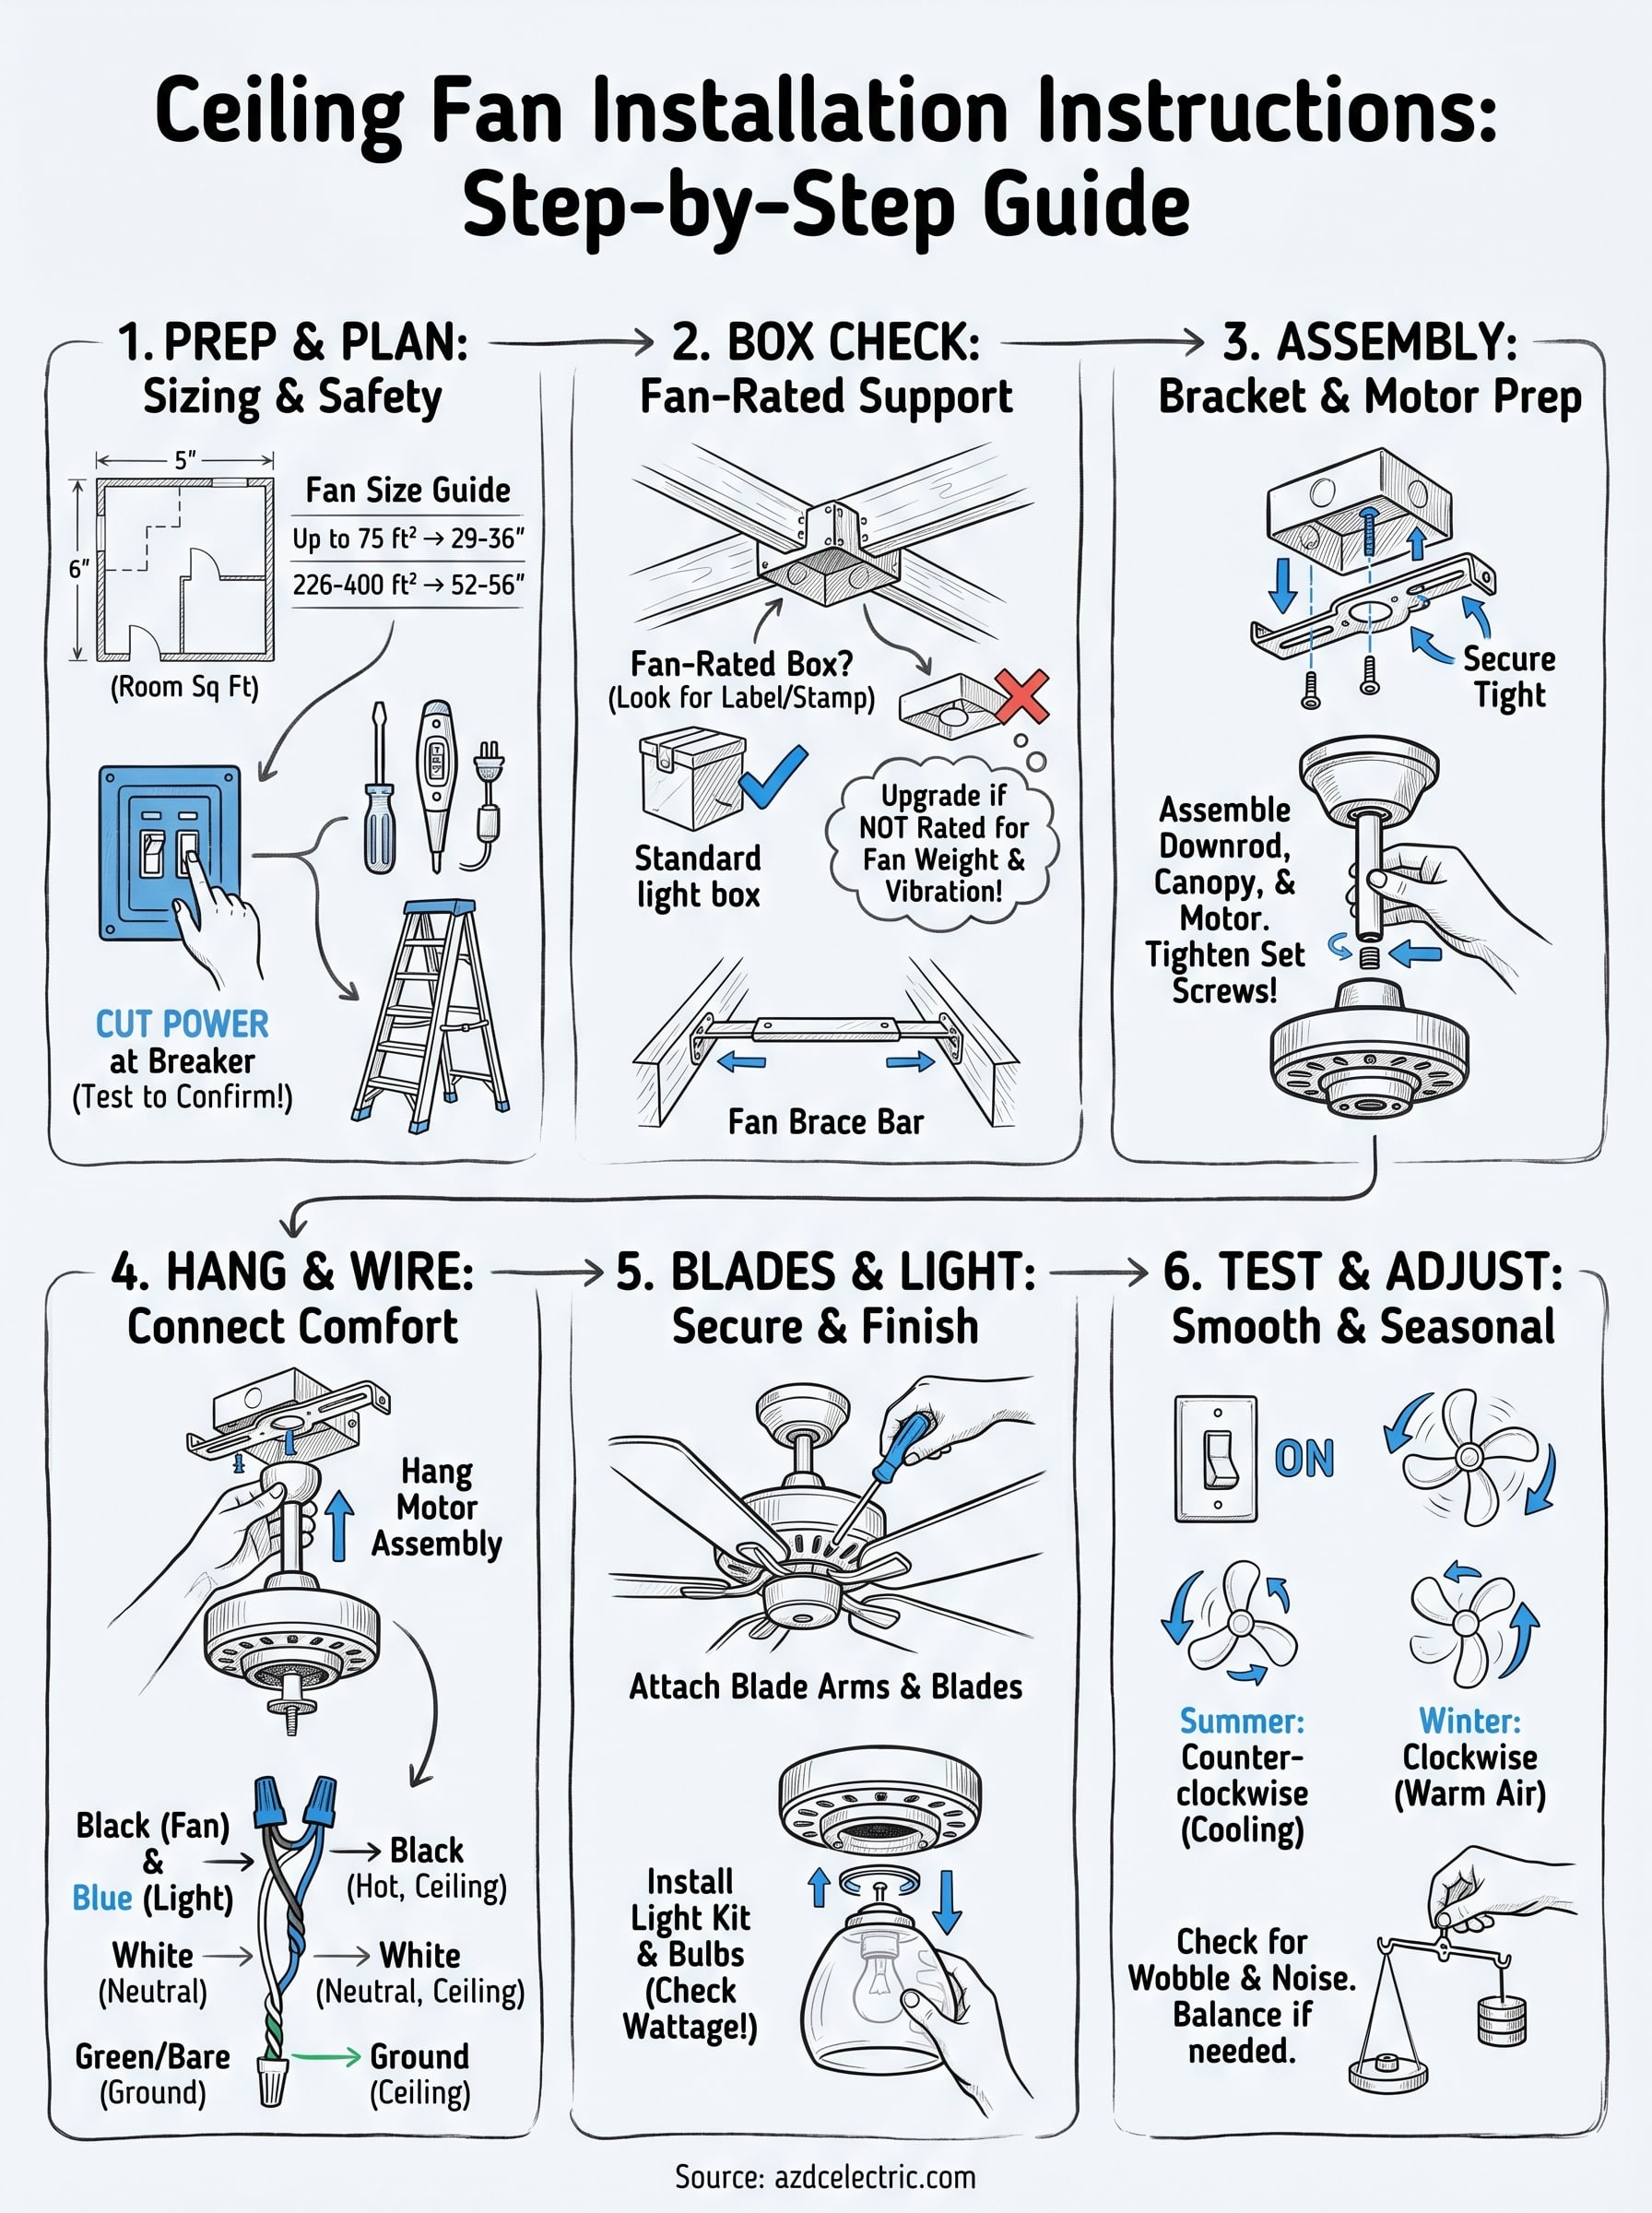
The type and condition of your electrical box matters significantly. A standard octagonal ceiling box is rated for light fixtures, not ceiling fans. Fans vibrate and oscillate during operation, which puts constant stress on the mounting point. You need either a fan-rated box (look for a label or stamp that says "Acceptable for Fan Support") or a fan brace kit that mounts between joists. Check the box before anything else so you know exactly what you’re working with before you begin.
Permits and code requirements
In most jurisdictions, replacing an existing ceiling fixture with a new fan does not require a permit. However, if you’re adding a new circuit, running new wiring through walls, or installing a fan in a location that has never had an electrical fixture, a permit is likely required. Check with your local building department before you start work. In Arizona, requirements vary by city, and Scottsdale, Phoenix, and Chandler each have their own inspection processes for residential electrical work.
Skipping a permit when one is required creates real problems when you sell the home, file an insurance claim, or need the work inspected later. A quick call to your local building department takes five minutes and can save you a much larger problem down the road.
Step 1. Confirm room size, height, and fan type
Before you touch a single screw, getting the right fan for your specific room saves you from returning to the hardware store mid-project. Most of these ceiling fan installation instructions assume you’ve already made this decision, but sizing errors are among the most common mistakes homeowners make. A fan that’s too small won’t move enough air, and one that’s too large will feel overpowering in a tight space.
Picking the wrong fan size is the most common pre-installation mistake, and it’s entirely avoidable by measuring your room before you buy.
Match fan size to room square footage
Fan blade span directly affects how well the fan cools a room, and manufacturers size their products around square footage ranges. Measure your room’s length and width, multiply them together, and use that number to pick the right blade span for your space.
| Room Size (sq ft) | Recommended Blade Span |
|---|---|
| Up to 75 sq ft | 29–36 inches |
| 76–144 sq ft | 36–42 inches |
| 145–225 sq ft | 44–50 inches |
| 226–400 sq ft | 52–56 inches |
| Over 400 sq ft | 60+ inches or multiple fans |
For large open-concept spaces or great rooms, consider installing two mid-size fans rather than one oversized unit. Two fans distribute airflow more evenly and reduce the visual bulk of a single large fixture in the middle of the ceiling.
Ceiling height and downrod length
Ceiling height determines which mounting style your fan needs, and getting this wrong creates a clearance and safety problem. Fan blades should hang between 8 and 9 feet above the floor for optimal airflow and safe head clearance. If your ceiling sits at exactly 8 feet, use a flush-mount (also called a hugger) fan that mounts directly against the ceiling surface. If your ceiling runs higher than 9 feet, you need a downrod long enough to bring the blades down into that ideal range.
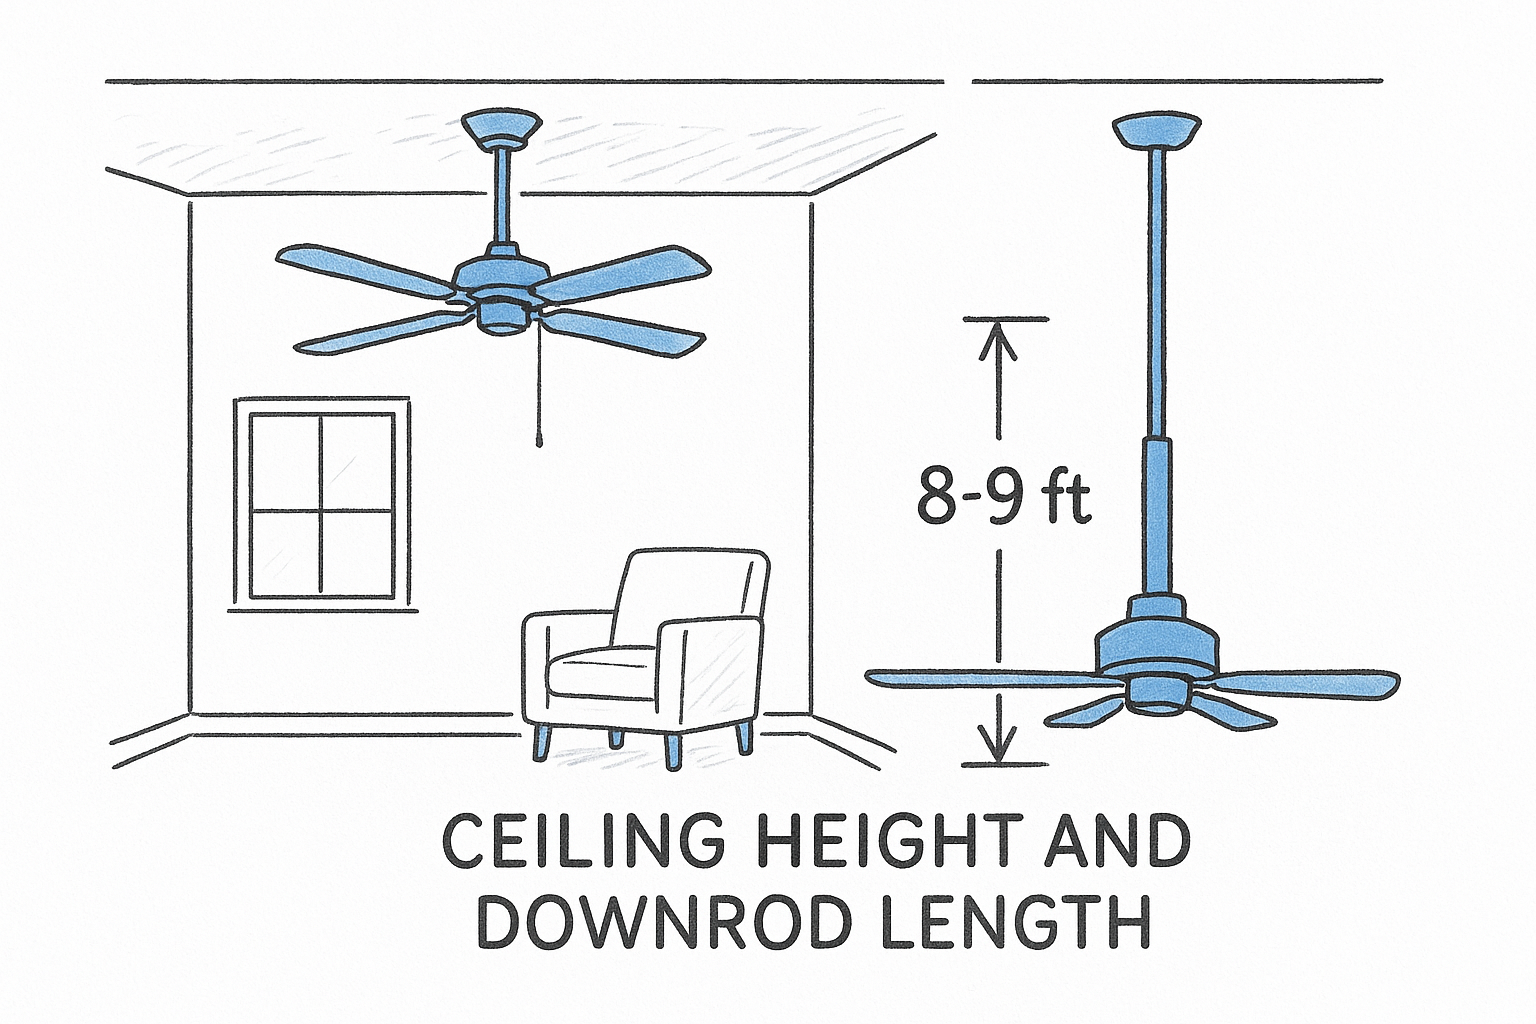
Use this simple calculation: subtract 8 feet from your ceiling height, then subtract the fan’s motor housing depth listed in the product specs, and the result gives you the minimum downrod length you need. For a 10-foot ceiling with a 10-inch motor housing, that works out to at least a 14-inch downrod. Most fans ship with a standard 3.5-inch or 6-inch downrod, so verify the included hardware before you finalize your purchase.
Step 2. Gather tools, parts, and safety gear
Having everything within arm’s reach before you start makes these ceiling fan installation instructions significantly faster and safer to execute. Running back to the hardware store mid-install wastes time, but more importantly, it means you may leave an open ceiling box unattended. Lay out all your tools, hardware, and safety gear on a tarp beneath the work area before you cut the power, so you can work through each step without interruption.
Staging your tools and parts in advance is not optional prep work. It is the step that keeps you from improvising with the wrong equipment while standing on a ladder.
Tools you’ll need
A Phillips-head screwdriver and a flathead screwdriver handle the vast majority of mechanical fastening in a ceiling fan install. Beyond those basics, you need a non-contact voltage tester to confirm the circuit is dead before touching any wires, wire strippers to prep conductors, and needle-nose pliers to tighten wire connectors cleanly. A cordless drill with a screwdriver bit speeds up blade attachment considerably, but a manual screwdriver works fine if that’s what you have.
- Phillips-head and flathead screwdrivers
- Non-contact voltage tester
- Wire stripper
- Needle-nose pliers
- Cordless drill (optional)
- Sturdy ladder rated for your height requirement
- Electrical tape
Parts to verify before you climb
Check the fan’s instruction manual against the contents of the box before you go up the ladder. Most fans include all the hardware you need, but confirm you have the mounting bracket, canopy cover, downrod, blade arms, blade brackets, and wire connectors. If the fan includes a remote receiver kit, locate that hardware now so you’re not searching for it mid-install.
If your home was built before 1972, check whether your existing ceiling wiring uses aluminum conductors instead of copper. Aluminum wiring requires anti-oxidant compound and aluminum-rated wire connectors. Standard wire nuts are copper-rated only, and using them on aluminum wiring creates a genuine fire risk. Pick up the correct materials before you begin if you suspect aluminum wiring.
Safety gear to put on before you start
Safety glasses and work gloves protect you from debris and sharp wire ends when working overhead. Use a stepladder rated for your combined body weight and tool weight, and position a second person nearby to steady the ladder and hand up hardware during the install.
Step 3. Shut off power and verify the circuit is dead
Shutting off power is the one step in these ceiling fan installation instructions where there is zero room for guessing. Electricity at the ceiling box runs at 120 volts, which is enough to cause a serious shock, cardiac arrest, or worse. Go to your electrical panel, locate the breaker that controls the room where you’re working, and flip it to the off position. If your panel is not labeled clearly, turn on the existing light fixture first, then flip breakers one at a time until the light goes out. That confirms you have the right circuit.
Never assume the power is off because the wall switch is in the off position. A switch only interrupts one conductor, and the other wires in the box remain energized until you cut the breaker.
Find the right breaker
Your electrical panel should have a directory on the inside of the door listing which breaker covers which room or circuit. If that directory is missing or inaccurate, use a plug-in lamp or the existing light fixture as a reference point while you test breakers. Write down the correct breaker number on a piece of tape and stick it near the panel so you can locate it quickly if you need to cut power again.
Once you flip the breaker, tape over it or place a note on the panel so nobody else in the home restores power while you’re working above your head. A simple piece of masking tape with "DO NOT FLIP – WORK IN PROGRESS" takes five seconds and eliminates the risk entirely.
Test the wires with a voltage tester
A non-contact voltage tester is the only tool that confirms the circuit is actually dead before you touch any wires. Hold the tester near the wires in the ceiling box without touching the conductors. If the tester beeps or its indicator light activates, power is still flowing and you need to stop immediately and identify which breaker is actually controlling that circuit.
Test every wire in the box, including the white neutral wire. On multi-wire branch circuits, a neutral can carry current even when the associated breaker is off. Confirm each conductor reads dead before you proceed to the next step.
Step 4. Check the electrical box and add a fan brace
Most ceiling fan installation instructions skip over this step or bury it in a footnote, but it is genuinely the most important structural check in the entire process. A ceiling fan can weigh anywhere from 15 to 50 pounds, and it generates constant vibration during operation. A standard light fixture box is rated to hold about 35 pounds of static weight but is not designed to handle the dynamic load a spinning motor creates. If you skip this check and mount a fan to a light-only box, you risk the entire assembly pulling out of the ceiling.
Installing a ceiling fan on an under-rated electrical box is the leading cause of fan failures, ceiling damage, and injury from dropped fixtures.
How to identify a fan-rated box
Remove the existing fixture and look directly at the electrical box mounted in the ceiling. A fan-rated box will have a label, stamp, or embossed marking that reads "Acceptable for Fan Support" or displays a fan icon. The box should also feel rigid when you push against it, with no flex or movement relative to the ceiling structure. If the box shifts, wobbles, or has no fan-rated label, replace it before you proceed.
Check whether the box is nailed or screwed directly into a ceiling joist. A metal box attached firmly to a joist is the most reliable mounting point and can typically support a fan without any additional hardware. Plastic boxes, even those rated for fans, offer less long-term durability under vibration and are best replaced with a metal fan-rated box or a brace kit.
How to install a fan brace
If your ceiling box sits between joists rather than attached to one, a fan brace bar is the correct solution. These expandable metal bars slide through the existing ceiling hole, expand outward until they lock against the joists on both sides, and provide a solid anchor point rated for fan weight and motion.
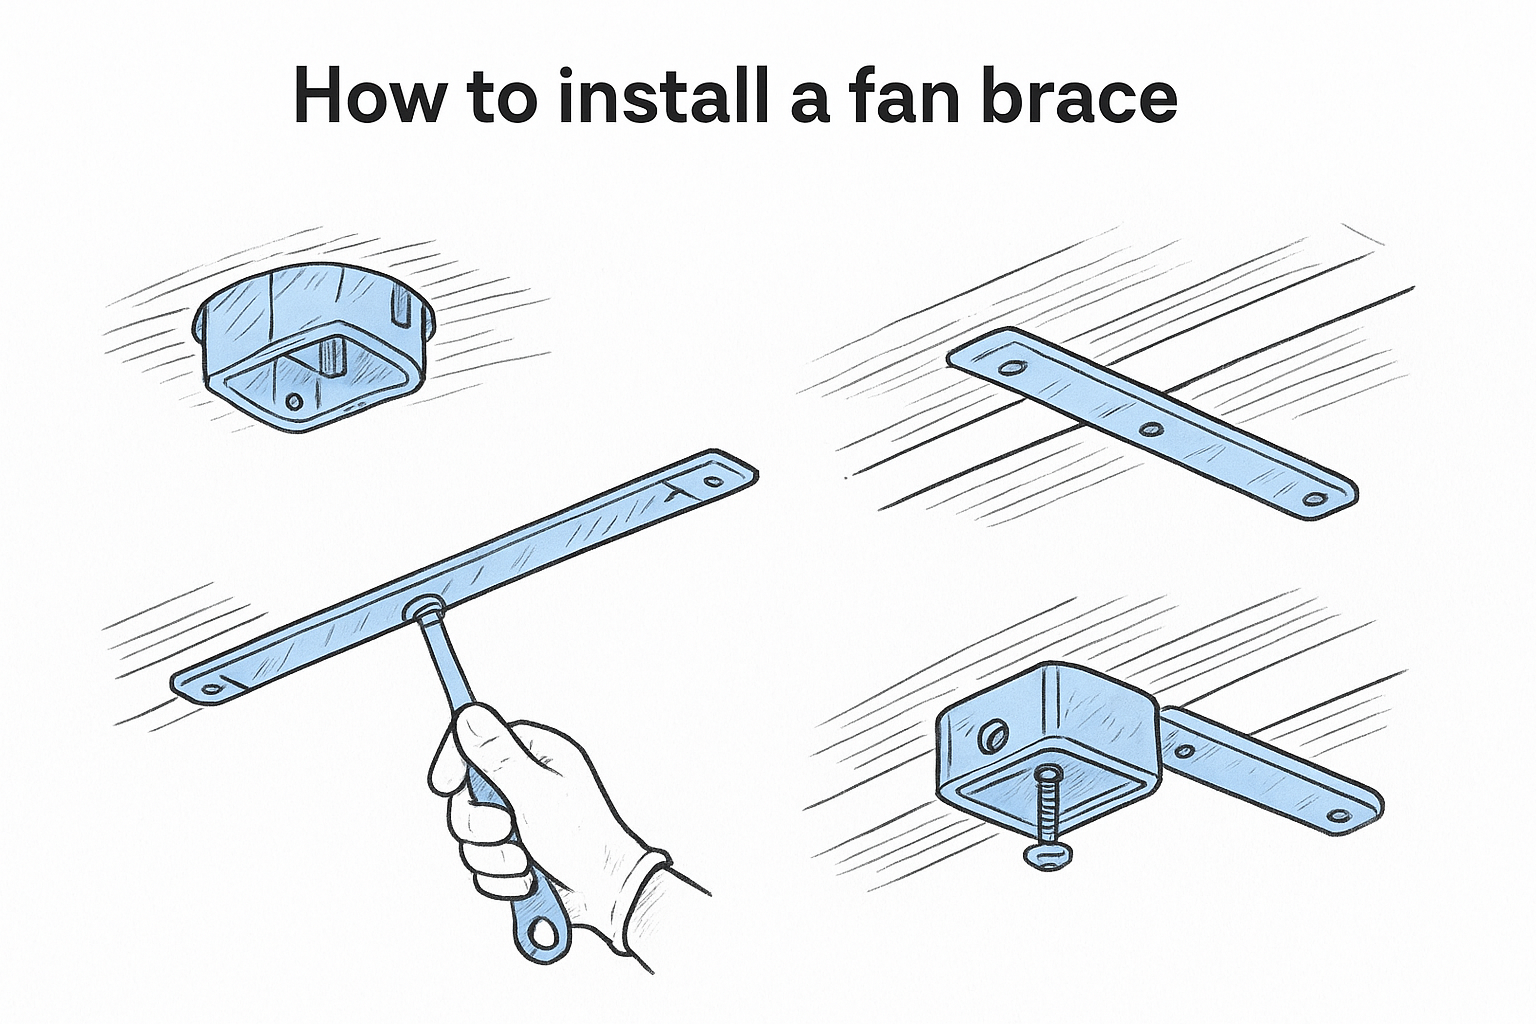
- Insert the brace bar through the ceiling hole
- Rotate the bar by hand until both ends contact the joists
- Tighten the brace with a wrench until it locks firmly
- Attach the included fan-rated mounting box to the brace’s center stud
- Confirm zero movement before continuing
Check your brace kit’s weight rating against your fan’s listed weight before purchase. Most residential brace kits support fans up to 70 pounds, which covers nearly all residential models.
Step 5. Install the mounting bracket and downrod
With a solid, fan-rated electrical box confirmed and locked in place, you’re ready to attach the hardware that physically holds the fan motor to your ceiling. This step follows a straightforward sequence, but skipping the torque check on any fastener here is how fans develop an annoying wobble six months after install. Work through these ceiling fan installation instructions one fastener at a time, and confirm each connection is tight before moving on.
A loose mounting bracket is the root cause of most wobble and noise complaints after installation, and it takes less than a minute to prevent.
Attach the mounting bracket to the box
Thread the mounting bracket directly onto the center stud of the electrical box, or align the bracket’s keyhole slots with the box’s mounting screws, depending on your fan’s hardware design. Most fan manufacturers include two or three machine screws that draw the bracket flat against the box face. Tighten each screw firmly in an alternating pattern so the bracket seats evenly rather than canting to one side.
- Hold the bracket against the box and align all screw holes before threading any fastener
- Start each screw by hand to avoid cross-threading
- Tighten in an alternating sequence, not one screw all the way before the others
- Pull downward on the bracket with moderate force to confirm it does not shift or rotate
Assemble and set the downrod length
The downrod threads into the top of the fan’s motor housing and carries the wiring from the motor up through the canopy. Slide your fan wires through the downrod from the motor end, then thread the downrod into the motor housing and tighten the included set screw with an Allen wrench to lock it in place. A loose set screw here causes the downrod to rotate inside the canopy, which creates noise and uneven blade rotation over time.
Check that the pin hole on the downrod aligns with the ball bracket channel. Most fans use a hanging ball that drops into a receiving bracket, allowing slight movement to prevent vibration transfer to the ceiling. Seat the ball fully into the bracket groove before releasing the motor’s weight onto it.
Step 6. Hang the fan and connect the wiring
This is the step in these ceiling fan installation instructions where the project either comes together cleanly or creates problems you’ll chase for weeks. Hanging the motor and making solid wire connections takes patience, because you’re often working overhead with one hand holding the fan’s weight and the other threading conductors. Ask your helper to support the motor housing from below while you work, and never let the fan hang by its wires at any point during this step.
Lift and seat the motor housing
Lift the motor assembly up toward the ceiling and hook the hanging ball on the downrod into the bracket’s receiver slot. The ball should drop in with a click and rest securely without any wobbling or shifting. Once it’s seated, the bracket carries the weight of the fan so both your hands are free to handle the wiring. Confirm the ball is fully locked in the channel before you let go, because a partially seated connection will drop the entire fan assembly.
If the motor feels unstable in the bracket or rotates freely when you apply light pressure, stop and re-seat the ball before touching the wires.
Connect the wires correctly
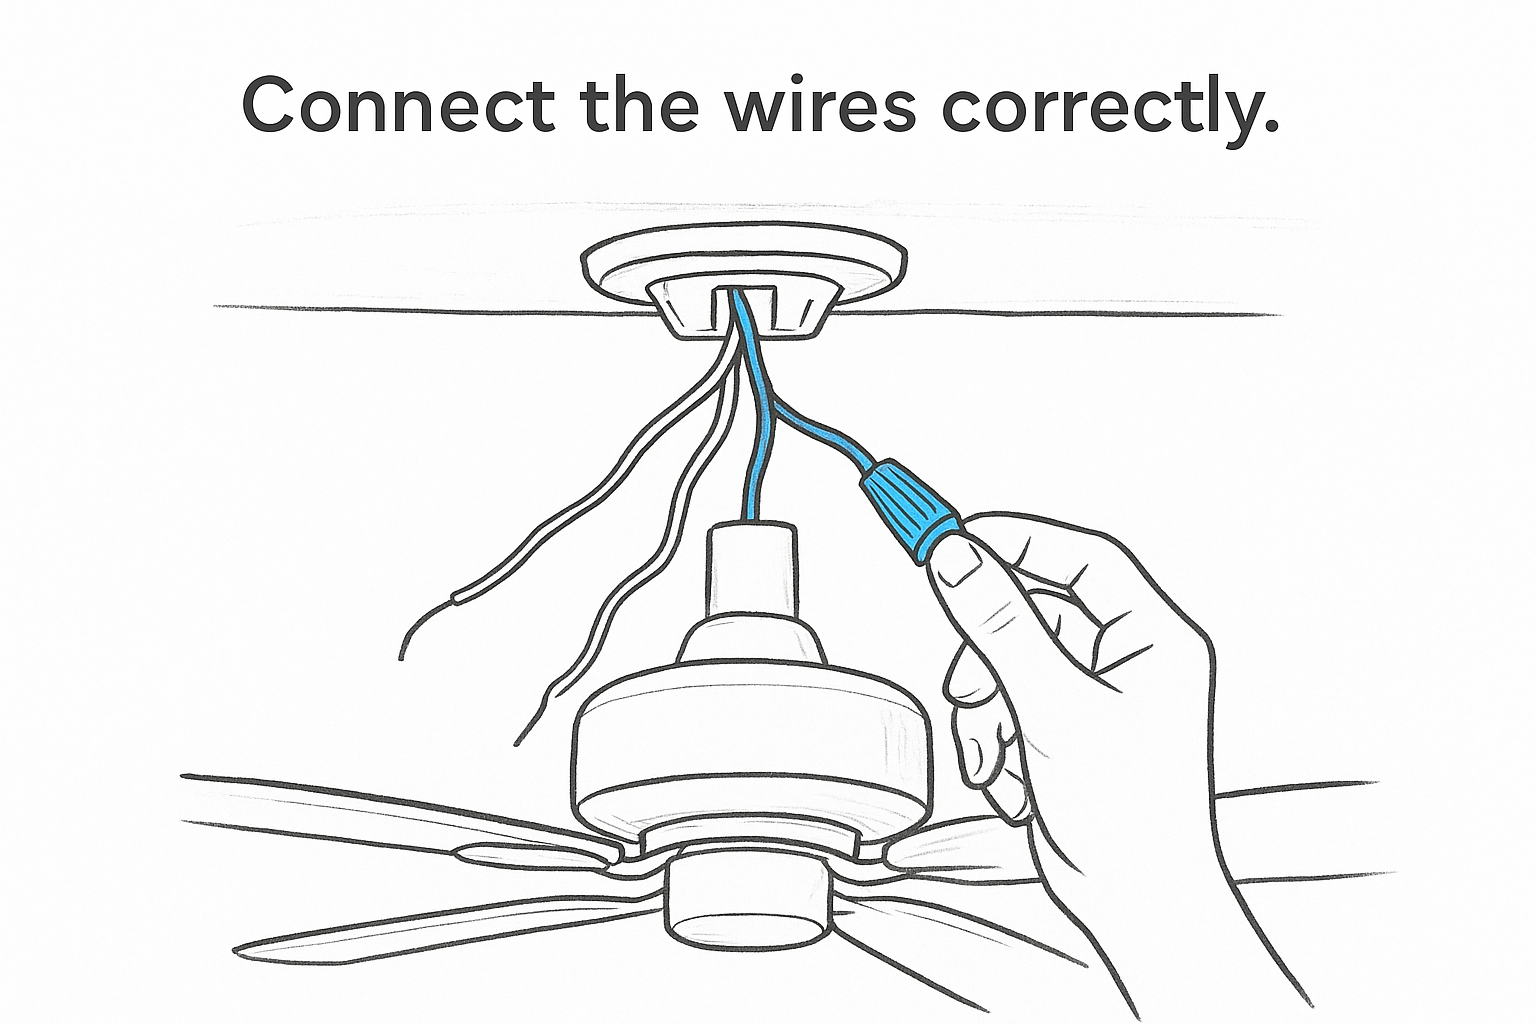
With the motor hanging freely, pull the ceiling wires and fan wires through the canopy opening so they meet in the accessible space below the box. Match each wire by color and purpose before twisting any connectors. Standard residential ceiling fan wiring follows this pattern:
| Ceiling Wire | Fan Wire | Purpose |
|---|---|---|
| Black (hot) | Black | Fan motor power |
| Black (hot) | Blue | Light kit power (if separate switch) |
| White (neutral) | White | Neutral return |
| Bare copper or green | Green or bare | Ground |
Twist each matched pair clockwise, then thread a wire connector over the pair and rotate it until it seats firmly. Tug each connection after capping it to confirm the wires don’t pull free. Wrap electrical tape around each connector in a clockwise direction for additional security, especially useful in humid climates like Phoenix where temperature swings can loosen connections over time. Fold all wires neatly into the ceiling box so nothing pinches when you slide the canopy up in the next step.
Step 7. Secure the canopy and attach blades
With your wiring connections solid and folded into the box, you’re ready to close up the ceiling assembly and get the blades on. This step in the ceiling fan installation instructions is mostly mechanical, but blade alignment and even torque on every fastener matter more than most people expect. Rushing through blade attachment is the number one cause of wobble after the fan is running.
Slide the canopy into place
Push the canopy cover up along the downrod until it sits flush against the ceiling. Most canopies attach using two or three screws that thread into the mounting bracket you installed earlier. Hold the canopy steady with one hand while you start each screw by hand before tightening any of them fully. This keeps the canopy level and prevents the cover from canting to one side as you drive the screws.
Tightening one canopy screw completely before starting the others is the most common reason the cover sits crooked or gaps on one side.
Once all screws are started, tighten them in an alternating sequence so the canopy draws up evenly. Give each screw a firm final turn but stop before you strip the threads in the canopy’s mounting holes. A snug, flush fit is the goal.
Attach the blade brackets and blades
Blade brackets, sometimes called blade irons, connect each blade to the motor’s blade arm receivers. Most fans ship with the brackets already attached to the blades, but if yours are separate, align the bracket’s pre-drilled holes with the holes at the narrow end of each blade and secure them with the included screws. Hand-tighten first, then snug each screw with your screwdriver.
- Hold each blade arm receiver level before inserting the blade bracket screws
- Start all screws by hand before tightening any of them fully
- Tighten each screw to the same feel, firm but not forced, across every blade
- Work around the fan in order so you don’t skip a blade arm
Check that each blade sits at the same angle by eyeballing them from below after all blades are attached. Mismatched blade pitch creates vibration the moment you power the fan on, and correcting it after the fact takes longer than getting it right now.
Step 8. Install the light kit and finish the assembly
With the blades mounted and the canopy closed, the last mechanical phase of these ceiling fan installation instructions is attaching the light kit. Most residential fans include a light kit as a separate component that snaps or screws onto the bottom of the motor housing. If your fan is a fan-only model with no light kit, skip ahead to the next step. For everyone else, this step takes about ten minutes and closes out the assembly.
Connect the light kit wiring
Before you snap the light kit body onto the motor housing, you need to connect the light kit’s wiring harness to the leads coming from the motor. The kit ships with a short wiring harness that ends in a plug or bare wire leads. Line up the connector with the matching port on the bottom of the motor housing and press it in firmly until you feel it click. If your kit uses bare wire leads instead of a plug, connect blue-to-blue (or blue-to-black if there is no blue wire) and white-to-white using the included wire connectors.
A light kit that is not fully seated on its connector will flicker or fail to turn on even when all other wiring is correct, so push the connector until it locks before moving forward.
Once the wiring is connected, align the light kit’s mounting tabs or screw holes with the corresponding points on the motor housing. Most kits use a quarter-turn lock or two small screws to hold the kit body in place. Rotate or fasten accordingly until the kit sits flush with no gaps.
Attach the globe or shade and install bulbs
Slide the globe or shade onto the light kit base, following the specific retention method your fan uses. Some globes thread on, some clip, and some lock with thumbscrews. Finger-tighten any retaining hardware so you can remove the globe later without tools if a bulb burns out.
Install bulbs that match the wattage limit printed on the label inside the light kit. Exceeding that rating generates heat that shortens bulb life and can damage the fixture. LED bulbs that fall within the rated wattage work best in ceiling fans because they produce less heat and last significantly longer than incandescent options.
Step 9. Restore power, set direction, and test
You’ve completed the mechanical and electrical work outlined in these ceiling fan installation instructions, so now you confirm everything works before calling the project done. Return to your electrical panel, flip the breaker back on, and remove the tape or note you placed earlier. Walk back to the room and stand below the fan before touching the wall switch.
Restore power safely
Check the ceiling visually before you flip the switch, looking for any hardware you may have left on top of the blades or any wiring that’s visibly pinched near the canopy. Once you’re satisfied everything looks right, turn on the wall switch and watch the fan spin up on its lowest speed setting. A smooth, quiet startup confirms your mounting, wiring, and blade attachment are solid. Any wobble, grinding, or electrical smell means you shut the fan off immediately and go back to identify the source.
If the fan hums loudly or trips the breaker the moment you restore power, cut the circuit immediately and recheck every wire connection before attempting to run the fan again.
Set the blade direction for the season
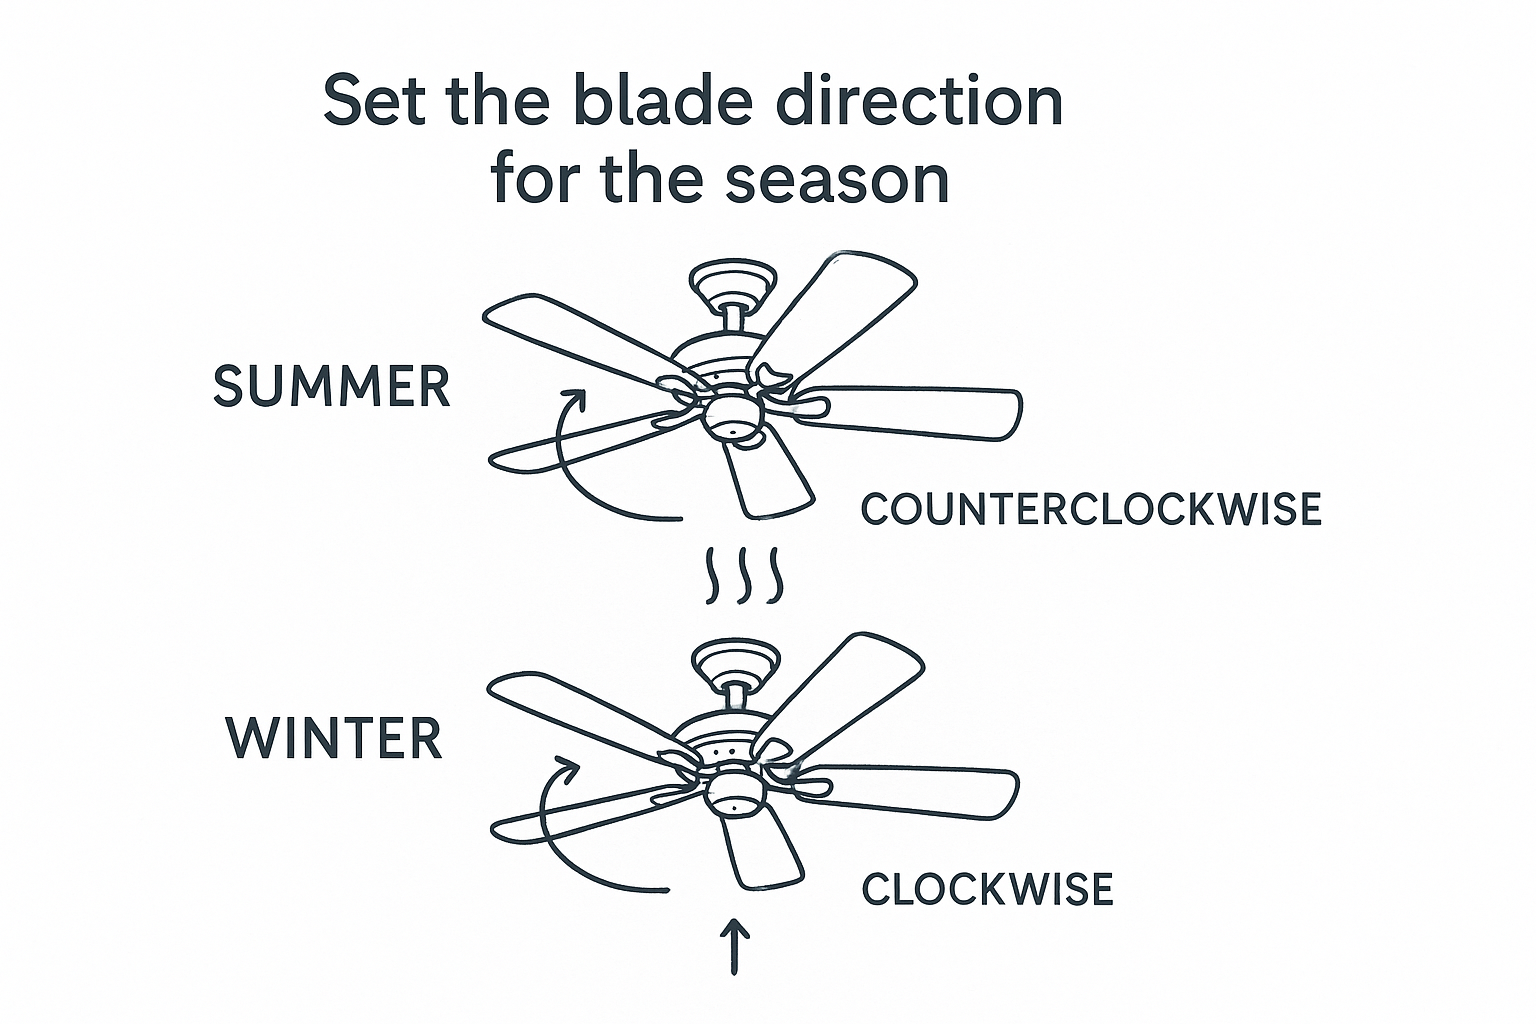
Ceiling fans should spin counterclockwise in summer to push air straight down and create a cooling effect in the room. In winter, reversing to a clockwise direction at low speed pulls cool air up along the walls and pushes the warm air that collects near the ceiling back down into the living space. Most fans include a small direction switch on the motor housing, and many newer models let you change direction through a remote or wall control.
| Season | Blade Direction | Airflow Effect |
|---|---|---|
| Summer | Counterclockwise | Pushes air downward, creates cooling draft |
| Winter | Clockwise | Pulls air up, redistributes warm air near ceiling |
Run the full test
Cycle the fan through all available speed settings, from low to high, and listen for any changes in noise or vibration as the motor accelerates. If your fan includes a light kit, test the light separately to confirm that connection is working correctly. Check the remote or wall control functions if your fan uses one, including the direction reversal, and note any features that need additional setup in the fan’s manual before you finalize the installation.
Step 10. Fix common issues and know when to call
Even a careful install occasionally produces a problem once the fan runs under real conditions. Most issues that show up right after you follow these ceiling fan installation instructions fall into a short list of known causes, and the fix is usually straightforward. Work through the symptoms below before you assume something is seriously wrong with the fan or your wiring.
Diagnosing wobble, noise, and power problems
Wobble after startup is almost always a blade issue, not a structural one. Check that every blade bracket screw is equally tight, then verify each blade sits at the same pitch by measuring the distance from the floor to the tip of each blade. A difference of more than a quarter inch creates the rocking motion you feel in the room. Most fan manufacturers include a balancing kit with small adhesive weights that you clip to the top of a blade to correct minor pitch variation without reinstalling anything.
| Symptom | Likely Cause | Fix |
|---|---|---|
| Wobble at all speeds | Uneven blade pitch or loose blade screws | Retighten blade screws, use balancing kit |
| Grinding noise | Downrod set screw loose | Tighten set screw with Allen wrench |
| Light works, fan does not | Blue and black wires swapped at connection | Recheck wiring, swap connections |
| Fan trips breaker | Overloaded circuit or short in wiring | Test on isolated circuit, inspect connections |
| Canopy rattles | Canopy screws not uniformly tight | Tighten in alternating pattern |
A grinding sound during operation almost always points to the downrod set screw working loose over the first few hours of use. Shut off the fan, cut the breaker, remove the canopy, and tighten the set screw with the correct Allen wrench until it bites firmly against the downrod.
When the problem is outside your scope
Some situations call for a licensed electrician rather than another troubleshooting attempt on your end. If your breaker trips every time you restore power, you have a wiring fault that requires a professional inspection before you run the fan again. The same applies if you notice any burning smell, discoloration near the ceiling box, or visible scorching on wire insulation.
Continuing to test a fan after a breaker trip or burning smell puts your home at genuine risk. Stop, cut the power, and call a licensed electrician.
If your home has aluminum wiring, ungrounded circuits, or a panel with known issues, those underlying problems need attention from a qualified electrician before any new fixture goes up.
Wrap-up and next steps
These ceiling fan installation instructions cover every stage of the process, from sizing the fan for your room to diagnosing wobble and noise after the first power-up. If you followed each step carefully, your fan should be running smoothly, set to the right seasonal direction, and solidly mounted with all wiring connections confirmed.
Most homeowners complete a straightforward replacement install without any major complications. Where projects get complicated is when you discover older wiring, an undersized electrical box, or no existing ceiling fixture at the location. Those situations add scope that goes beyond a standard DIY afternoon.
If your install revealed any of those underlying issues, or if you’d rather hand the whole job to a professional from the start, the team at AZ DC Electric works across the Greater Phoenix Metro Area with upfront pricing and a 5-year workmanship guarantee. Book a ceiling fan installation in Phoenix and get it done right the first time.